Tutorial 2: Hill Climbing

Next we'll create a complete project, built up stage by stage, with each step explained along the way. If you have some experience with StarLogoT, or programming in general, you might want to grab some pre-existing model and starting tinkering with it. (Two classic beginner's models are "Virus" and "Fire." Work with one of them to create a new sub-model by changing which variables have sliders, by introducing new factors to the project, etc. Check the Info windows, under "Extending the Model" for more details.)

1. Creating a New Project: Getting Started

To creat a new project, select "New" from the "File" menu. Then start your model by creating a once-button called "setup." This button will initialize your project and prepare StarLogoT for what's to come. You create this button by clicking on the blue button icon on the StarLogoT toolbar, and then clicking and dragging where you want the button to be on the Interface window. Release the mouse button to create your button and open a window giving values for the button's attributes. Type "setup" in the 'StarLogoT Instruction box and press OK.

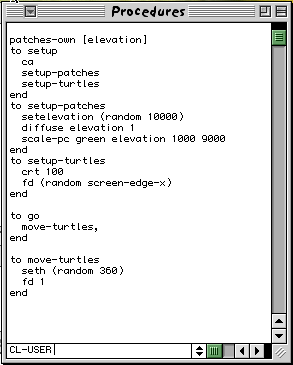
Then go to the Procedures window, and create the setup procedure like this:

to setup 
  ca 
  crt 100 
  fd (random screen-edge-x) 
end

To review this command one line at a time:

ca is short for clearall (another acceptable StarLogoT primitive that does the same thing). This command blanks out the screen, initialize your variables to 0, and kills all turtles. Basically ca wipes the slate clean for a new run of the project.

crt 100 then creates 100 turtles. Each turtle begins at the origin (location 0,0), which is why you seem to see one turtle and not the full 100. They're stacked on top of each other; many turtles share the same patch. Each newly created turtle has its own color and heading. These attributes are fairly evenly distributed through the range of StarLogoT colors (for color), and around the circle (for heading).

Finally, fd (random screen-edge-x) is really a combination of two commands. Each turtle first evaluates the line random screen-edge-x which returns a random value between 0 and "screen-edge-x" (whatever the dimension of your screen are, maybe 50 or so). Each then goes fd this number of steps.

Press your "setup" button after the code is done. The turtles quickly spread in a rough circle.

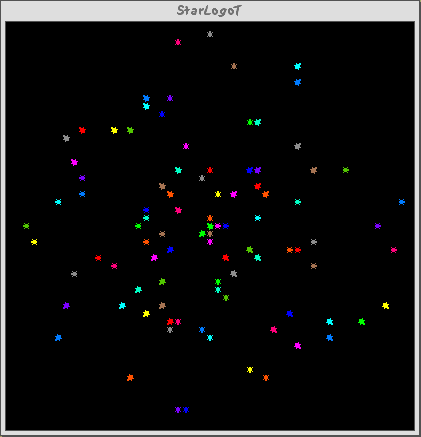
Notice the density distribution of the turtles in the Graphics window. Press "setup" a few more times and watch the turtles' arrangement change. When you're satisfied that the button does what you want (you want the turtles to be somewhere on the screen, right?), it's time to write your next procedure.

Make a forever-button called "go" by creating a button and checking the Forever box in the Creation dialog box.

Then write its procedure:

to go 
  move-turtles, 
end

Pretty neat, huh? But what does move-turtles do? Is it a primitive, like fd is? No, it's a procedure that you're about to write, right after the go procedure listing:

to move-turtles 
  seth (random 360) 
  fd 1 
end

Let's review it line by line:

seth (random 360) is another two-step command. First, each turtle picks a random integer between 0 and 359 (random doesn't include the number you give it). Then it sets its heading to be this number. Heading is measured in degrees starting with 0 degrees at 12:00 and running clockwise around the circle.

After each turtle does that, it moves forward one step in this new direction.

What about the comma? The comma that follows "move-turtles" in the procedure go is another StarLogoT command that tells StarLogoT to pause there until all turtles have finished the move-turtles procedure. You can read about the comma command in greater detail in The StarLogoT Development Reference Manual. For now, know that it is important to place commas anywhere in the code where turtles might get ahead of other turtles, in terms of code execution, but when it is important to keep everything synchronized.

Why couldn't we have just written that in go? Because as you build your project, the model's control structure is likely to change many times. go is this main control structure. (This isn't a requirement for StarLogoT programs, but it's a convention we follow.) We'd like to keep go as simple as possible so it's easy to understand. (And it's just good programming, darn it!)

The "go" button is a forever-button, which means it executes its code continually until you shut it off by clicking it again. After pressing "setup" once to ensure there are turtles to move around, press the "go" button. Watch what happens. Turn it off, and watch the turtles stop in their tracks.

You can take it from here and experiment with other turtle commands. Type commands in the Command window (like setc red), or add them to setup, go, or move-turtles. You might try typing pendown in the Command window or changing seth (random 360) to lt (random 45). Or, instead of saying crt 100 in setup, say crt number, where number is a slider variable. One of StarLogoT's many strenghts is that it's easy to play around with things. Then, continue with the tutorial project.

2. Developing Your Model: Patches and Variables

So now we've got 100 turtles aimlessly moving around, completely unaware of their surroundings. Let's make things a little more interesting by giving these turtles a nice background against which to move. Return to the setup procedure. We can rewrite it to sync better with the go procedure:

patches-own [elevation] 
to setup 
  ca 
  setup-patches 
  setup-turtles 
end 
to setup-patches 
  setelevation (random 10000) 
  diffuse elevation 1 
  scale-pc green elevation 1000 9000 
end 
to setup-turtles 
  crt 100 
  fd (random screen-edge-x) 
end

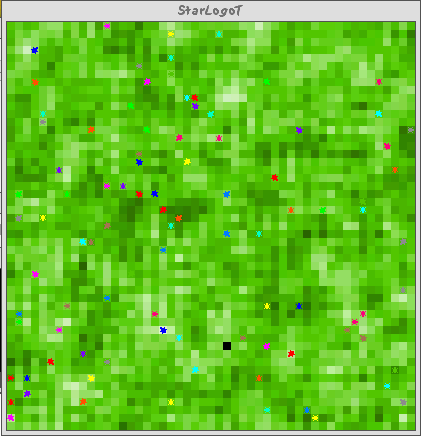
setup-turtles is familiar, being exactly what we were doing in our old setup. The line at the top, patches-own [elevation] declares that we have a variable for the patches called elevation. Our setup-patches procedure then uses this variable. First, each patch picks a random number between 0 and 9999, inclusive, and sets its elevation value to that number. We then use a patch primitive, diffuse, that essentially smoothes out the distribution of this variable over all the patches.

We can see the effect of diffuse in the next command, scale-pc, which uses the different values of elevation to assign colors to the patches. In this case, we assign different shades of green to all the patches. (Don't worry about the numbers given to diffuse and scale-pc just yet.) The larger elevation is, the lighter the shade of green. Low values of elevation result in darker shades.

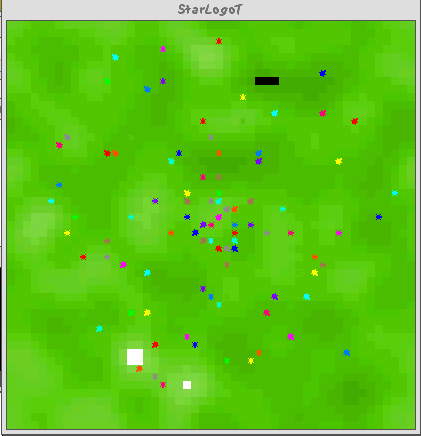
Type this in and press the "setup" button. Voila. We have a lush StarLogoT landscape. Here you can see how diffuse works.

Return to the Procedures window, and comment-out the diffuse command by adding a semi-colon in front of it like this:

;diffuse elevation 1 

Press "setup" again. Doesn't look as good, does it? This is because, as mentioned above, diffuse has each patch share its value of elevation with all its neighbors. Every patch resets its value of elevation to a new value that depends on the value of elevation all around it. Don't worry if you don't quite get what's going on here. You can read about in The StarLogoT Development Reference Manual. It may help to play with the values being passed to it, and see what happens.

We're ready to start creating some kind of dialogue between the turtles and the patches. In fact, we even have an idea for a project. Notice that we called the patch variable "elevation?" Also, our landscape sort of looks topographical. We're going to have our turtles do what is called "hill-climbing," where every turtle seeks to find the highest elevation it can. Go to the Command Center and type show max-of-patches [elevation] and show min-of-patches [elevation]. These two reporters will, respectively, search over all the patches to return to you the highest elevation and the lowest.

One last thing before we delve into the coding. Those two values we just read, the highest and the lowest elevations, might be nice to know. Rather than re-typing that each time, let's use a shortcut. At the top of your code (right after the patches-own declaration), declare two global variables:

globals [highest ;; the highest patch elevation 
         lowest] ;; the lowest patch elevation 

and in setup-patches, write:

to setup-patches 
  setelevation (random 10000) 
  diffuse elevation 1 
  scale-pc green elevation 1000 9000 
  sethighest max-of-patches [elevation] 
  setlowest min-of-patches [elevation] 
  if (elevation > (highest - 100)) 
  [setpc white] 
  if (elevation < (lowest + 100)) 
  [setpc black] 
end

Now we have saved the highest and lowest points in our terrain and determined where these points are graphically.

Let's look at the two if statements. Each patch looks at both statements and compares its own elevation to our global variables. If the comparison evaluates to true, the patch executes the list of commands that follows. In this case, the command is simply to change colors.

We're having all patches whose elevation values are near (within about 1% of) the highest value change their colors to white. All patches whose elevation values are close to the lowest become black. This makes them easier to see. You can make a few quick changes here if you wish. They won't affect the rest of the model. If you have trouble seeing these peaks and valleys, first type die in the Command window to eliminate the turtles. Then, instead of coding setpc white and setpc black, you can say setpc blue and setpc red, or whichever colors you wish. Also, you can change the range of highest and lowest peaks by changing the number 100.

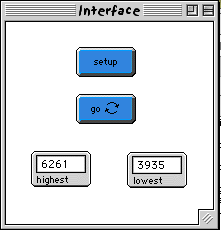
After this, create two monitors in the Interface window with the toolbar. (Click the Monitor icon on the toolbar, and then click and drag a region in the Interface window where you want a monitor to be.)

Set the decimal places to be 3, and name one "highest" and one "lowest." Then, every time you click "setup" and re-distribute the values of elevation, you'll know exactly what the highest values are, and where they can be found.

3. An Uphill Algorithm

Okay. Finally, we're ready to start hill-climbing. To review, we've got some turtles randomly spread out from the origin. We've got a landscape of patches, whose primary attribute is their elevation. Lastly, we have two kinds of tools to help us understand the patch landscape. Each patch has a color, directly dependent on its elevation value, and we have a two monitors showing the highest peak and lowest valley. Now we want the turtles to wander around and seek the highest patch.

Let's try a simple (i.e. naive) algorithm first. We'll assume the turtles cannot see ahead more than just one patch and that each turtle moves only one square each turn. Also, our turtles are blissfully ignorant of each other. Before, we had a procedure move-turtles like this:

to move-turtles 
  seth (random 360) 
  fd 1 
end

But we don't want them to move randomly about. We want each turtle to look at the elevation of each nearby patch, and move to the highest one (i.e., execute a "greedy" search). If no surrounding patches have a higher elevation, the turtle stays put and keeps quiet. Here's the code:

turtles-own [curr-best-h    ;; current best heading, I'll 
                            ;; move in this direction 
             curr-best-ele] ;; current best elevation, 
                            ;; used for comparing to others 

...

 
to move-turtles 
  setcurr-best-h -1 
  setcurr-best-ele (elevation-at 0 0) 
  if ((elevation-at -1 1) > curr-best-ele) 
  [setcurr-best-ele (elevation-at -1 1) 
   setcurr-best-h 315] 
  if ((elevation-at 0 1) > curr-best-ele) 
  [setcurr-best-ele (elevation-at 0 1) 
   setcurr-best-h 0] 
  if ((elevation-at 1 1) > curr-best-ele) 
  [setcurr-best-ele (elevation-at 1 1) 
   setcurr-best-h 45] 
  if ((elevation-at 1 0) > curr-best-ele) 
  [setcurr-best-ele (elevation-at 1 0) 
   setcurr-best-h 90] 
  if ((elevation-at 1 -1) > curr-best-ele) 
  [setcurr-best-ele (elevation-at 1 -1) 
   setcurr-best-h 135] 
  if ((elevation-at 0 -1) > curr-best-ele) 
  [setcurr-best-ele (elevation-at 0 -1) 
   setcurr-best-h 180] 
  if ((elevation-at -1 -1) > curr-best-ele) 
  [setcurr-best-ele (elevation-at -1 -1) 
   setcurr-best-h 225] 
  if ((elevation-at -1 0) > curr-best-ele) 
  [setcurr-best-ele (elevation-at -1 0) 
   setcurr-best-h 270] 
  , 
  if (curr-best-h >= 0) 
  [seth curr-best-h 
  fd 1] 
  , 
end

It may seem lengthy, but it's really just the same thing repeated eight times.

We start at the upper-left-hand corner. By local coordinates, that's (-1,1). We go clockwise around all eight patches. We save the highest elevation we've found so far in curr-best-ele so we can compare future elevations to this one, and we save the heading of that direction, so we'll know what direction to move in if we find a good patch.

Notice a few things here. First, we start by setting curr-best-ele to the elevation of the patch we're already on, with local coordinates (0,0).

Second, a turtle can easily learn a nearby patch's elevation by saying elevation-at <dx> <dy> , where <dx> and <dy> are the x-distance and y-distance away from the asking turtle.

Third, we use commas to ensure that no turtles get out of hand. It probably wouldn't be a problem anyways, especially with 100 turtles, but it's good practice.

Go ahead and type it all in. But before you test it out by pressing the "go" button, ask yourself what will happen. Try predicting how and where a turtle will move and how long it will take to get there. When you're ready, press the button and see for yourself.

Not too exciting. Surprised? Try to understand why the turtles converge at their peaks so quickly. Maybe you don't believe the algorithm we've chosen works correctly. There's a simple change you can make to test it, though. Rewrite setup-patches so it says:

to setup-patches 
  setelevation ycor 
end

Now run the project. Notice the turtles all head for the highest elevation, which is the top of the screen. (They all move to the upper-left because of the order in which they look at the surrounding patches.)

Our turtles rapidly arrive at local maximums in our landscape. Local maximums and minimums abound in a randomly generated landscape like this one. Our goal is to still get the turtles to find an "optimal maximum," one of the white patches. We need to start refining the model.

Part of the problem is that our terrain is terribly erratic. Every patch picked a random elevation, and then we diffused these values all at once. This really doesn't give us a continuous spread of elevation across the graphics screen, as you might have noticed. We can correct this problem to an arbitrary degree by diffusing more often. Replace the line:

diffuse elevation 1 

with:

  repeat 5 
  [diffuse elevation 1]

The repeat primitive is another way for StarLogoT to loop. repeat takes a number (here, 5) and a command list (here with only our diffuse command), and executes the command list a number of times equal to the value we give it. Try it, and observe the landscape (i.e. press "setup" and see what you think). Then, press "go" and watch the turtle's performance. (Remember: the lighter the patch, the greater the elevation.)

Obviously, having fewer peaks improves the turtle's performance. Or maybe you think this is cheating. After all, the turtles really aren't doing any better. Their problem just got easier! True enough. If you call repeat with an even higher number (40 or so), you'll end up with only a handful of peaks, as the values become more evenly distributed with every successive call. Watch your monitor values.

Instead of specifying just how "smooth" you want your world to be, let's make it variable. Maybe one time you'll want the turtles to solve a hard world and another time you'll just want to look at a nice landscape. So we'll make a slider variable.

Create a slider, called "smoothness," in the Interface window. Leave the minimum at 0 but lower the maximum to around 50. This smoothness value will be the number of times the diffuse primitive is called, so change your code to:

  repeat smoothness 
  [diffuse elevation 1]

Experiment with different worlds, and the turtles' performance.

Before trying to solve the greedy-search problem, it would be nice to have some other, more precise method for evaluating the turtles' performance Watching little squares writhe about in the Graphics window only helps so much. Fortunately, StarLogoT gives us plot windows for building and charting graphs as we go along.

We'll need two more procedures. One initializes the plot windows for graphing and the other maintains them during run-time. In the setup procedure, write:

to setup 
  ca 
  setup-patches 
  setup-turtles 
  setup-plots 
end 

and in 'go' write:

to go 
  move-turtles, 
  do-plots 
end

Then write these two new procedures, setup-plots and do-plots:

to setup-plots 
  pw1 
  auto-plot-on 
  setplotwindow-name "|Turtles at Peaks| 
  setplot-xlabel "|Time| 
  setplot-xrange 0 300 
  setplot-ylabel "|Number| 
  setplot-yrange 0 count-turtles 
  pp1 
  setppc red 
end

...

 
to do-plots 
  pw1 
  pp1 
  plot (count-turtles-with 
  [((elevation-at 0 0) >= (highest - 100))]) 
end

What we're graphing is the number of turtles who've reached our "peak-zone" (within 1% of the highest elevation) at some time. Step by step, the commands in our 'setup-plots' procedure do the following:

And then for do-plots: we select the first plot window, and then the first plot pen (currently redundant, as they were already selected in setup-plots, but maybe we'll add more later.). Then plot a point.

We're plotting the number of turtles within 100 units of our maximum elevation at some given point in time. The plot command knows to draw a connected graph at our current x-coordinate on the graph, and then updates this x-coordinate by 1 automatically.

Now reset the project and run it again. Watch the graph in the Plot window. You might try running the model several times under different settings (i.e. different values of smoothness) and watch how fast, or whether, the graph converges to some value.

So now you have a nice framework for exploring the hill-climbing problem and can use a variety of StarLogoT modeling features: buttons, sliders, monitors, the Graphics and Plot window displays, etc. You've even written a quick and dirty procedure to give the turtles something to do. And that's where this tutorial leaves off. You can continue if you like, experimenting with different variables and algorithms to see what works the best (what makes the most turtles reach the peaks). Or, look at other models, or build your own. You don't even have to model anything. You can just watch turtles and patches do their things, like forming patterns. Hopefully you will have learned a few things, both in terms of syntax and general methodology for model-building. The entire code as created above is below, for your viewing enjoyment.

There are a few miscellanious bugs and quirks you might have already noticed. Here are some quick changes you can make: One, we have a green landscape. A naturally green turtle is hard to see. In setup-turtles, you can say:

if (color = green) [setc red]

Two, instead of always using 100 turtles, you can run the project with a variable number of turtles. Make a slider variable (called "number) and instead of crt 100, type:

crt number

How does changing the number of turtles affect the conversion value displayed by the graph?

4. The Sample Project 'Hill-Climbing' Source Code

turtles-own [curr-best-h      ;; the best heading I've found 
             curr-best-ele]   ;; the best elevation I've found 
patches-own [elevation]       ;; elevation of the patch 
globals     [highest          ;; maximum patch elevation 
             lowest]          ;; minimum patch elevation 
;; We also have two slider variables, 'number' and 
;; 'smoothness'. 'number' determines the number of turtles, 
;; and 'smoothness' determines how erratic our terrain 
;; becomes during diffusion of 'elevation'.

;; INITIALIZATION PROCEDURES 
to startup 
  ca 
end

;; resets everything 
to setup 
  ca 
  setup-patches 
  setup-turtles 
  setup-plots 
end 

;; creates a random landscape of patch elevations 
to setup-patches 
  setelevation (random 10000) 
  repeat smoothness
    [diffuse elevation 1] 
  scale-pc green elevation 1000 9000 
  sethighest max-of-patches [elevation] 
  setlowest min-of-patches [elevation] 
  if (elevation > (highest - 100))
    [setpc white] 
  if (elevation < (lowest + 100)) 
    [setpc black] 
end 

;; initializes the turtles 
to setup-turtles 
  crt number 
  fd (random screen-edge-x) 
end 

;; initializes all plot windows 
to setup-plots 
  pw1 
  auto-plot-on 
  setplotwindow-name "|Turtles at Peaks| 
  setplot-xlabel "|Time| 
  setplot-xrange 0 300 
  setplot-ylabel "|Number| 
  setplot-yrange 0 count-turtles 
  pp1 
  setppc red 
end 
  
;; RUN-TIME PROCEDURES 
;; main program control 
to go 
  move-to-local-max, 
  do-plots 
end 

;; performs a greedy-search of radius 1 for highest elevation 
to move-to-local-max 
  setcurr-best-h -1 
  setcurr-best-ele (elevation-at 0 0) 
  if ((elevation-at -1 1) > curr-best-ele) 
    [setcurr-best-ele (elevation-at -1 1) 
     setcurr-best-h 315] 
  if ((elevation-at 0 1) > curr-best-ele)
    [setcurr-best-ele (elevation-at 0 1) 
     setcurr-best-h 0]
  if ((elevation-at 1 1) > curr-best-ele)
    [setcurr-best-ele (elevation-at 1 1) 
     setcurr-best-h 45] 
  if ((elevation-at 1 0) > curr-best-ele) 
    [setcurr-best-ele (elevation-at 1 0) 
     setcurr-best-h 90] 
  if ((elevation-at 1 -1) > curr-best-ele) 
    [setcurr-best-ele (elevation-at 1 -1) 
     setcurr-best-h 135] 
  if ((elevation-at 0 -1) > curr-best-ele) 
    [setcurr-best-ele (elevation-at 0 -1) 
     setcurr-best-h 180] 
  if ((elevation-at -1 -1) > curr-best-ele) 
    [setcurr-best-ele (elevation-at -1 -1) 
     setcurr-best-h 225] 
  if ((elevation-at -1 0) > curr-best-ele) 
    [setcurr-best-ele (elevation-at -1 0) 
     setcurr-best-h 270] 
  , 
  if (curr-best-h >= 0) 
    [seth curr-best-h 
     fd 1] 
  , 
end

to do-plots 
  pw1 
  pp1 
  plot (count-turtles-with 
          [((elevation-at 0 0) >= (highest - 100))]) 
end