![[color chart]](images/colors.jpg)
This section describes the NetLogo programming language.
The Code Example models mentioned throughout can be found in the Code Examples section of the Models Library.
The NetLogo world is made up of agents. Agents are beings that can follow instructions. Each agent can carry out its own activity, all simultaneously.
In NetLogo, there are four types of agents: turtles, patches, links, and the observer. Turtles are agents that move around in the world. The world is two dimensional and is divided up into a grid of patches. Each patch is a square piece of "ground" over which turtles can move. Links are agents that connect two turtles. The observer doesn't have a location -- you can imagine it as looking out over the world of turtles and patches.
When NetLogo starts up, there are no turtles yet. The observer can make new turtles. Patches can make new turtles too. (Patches can't move, but otherwise they're just as "alive" as turtles and the observer are.)
Patches have coordinates. The patch at coordinates (0, 0) is called the origin and the coordinates of the other patches are the horizontal and vertical distances from this one. We call the patch's coordinates pxcor and pycor. Just like in the standard mathematical coordinate plane, pxcor increases as you move to the right and pycor increases as you move up.
The total number of patches is determined by the settings min-pxcor, max-pxcor, min-pycor, and max-pycor When NetLogo starts up, min-pxcor, max-pxcor, min-pycor, and max-pycor are -16, 16, -16, and 16 respectively. This means that pxcor and pycor both range from -16 to 16, so there are 33 times 33, or 1089 patches total. (You can change the number of patches with the Settings button.)
Turtles have coordinates too: xcor and ycor. A patch's coordinates are always integers, but a turtle's coordinates can have decimals. This means that a turtle can be positioned at any point within its patch; it doesn't have to be in the center of the patch.
Links do not have coordinates, instead they have two endpoints (each a turtle). Links appear between the two endpoints, along the shortest path possible even if that means wrapping around the world.
The way the world of patches is connected can change. By default the world is a torus which means it isn't bounded, but "wraps" -- so when a turtle moves past the edge of the world, it disappears and reappears on the opposite edge and every patch has the same number of "neighbor" patches; if you're a patch on the edge of the world, some of your "neighbors" are on the opposite edge. However, you can change the wrap settings with the Settings button. If wrapping is not allowed in a given direction then in that direction (x or y) the world is bounded. Patches along that boundary will have fewer than 8 neighbors and turtles will not move beyond the edge of the world. See the Topology section for more information.
In NetLogo, commands and reporters tell agents what to do. A command is an action for an agent to carry out. A reporter computes a result and report it.
Most commands begin with verbs ("create", "die", "jump", "inspect", "clear"), while most reporters are nouns or noun phrases.
Commands and reporters built into NetLogo are called primitives. The NetLogo Dictionary has a complete list of built-in commands and reporters.
Commands and reporters you define yourself are called procedures. Each procedure has a name, preceded by the keyword to. The keyword end marks the end of the commands in the procedure. Once you define a procedure, you can use it elsewhere in your program.
Many commands and reporters take inputs -- values that the command or reporter uses in carrying out its actions.
Examples: Here are two command procedures:
to setup
  clear-all      ;; clear the world
  crt 10         ;; make 10 new turtles
end

to go
  ask turtles
    [ fd 1             ;; all turtles move forward one step
      rt random 10     ;; ...and turn a random amount
      lt random 10 ]
end
Note the use of semicolons to add "comments" to the program. Comments make your program easier to read and understand.
In this program,
setup and go can be called by other procedures or by buttons. Many NetLogo models have a once button that calls a procedure called setup, and a forever button that calls a procedure called go.
In NetLogo, you must specify which agents -- turtles, patches, links, or the observer -- are to run each command. (If you don't specify, the code is run by the observer.) In the code above, the observer uses ask to make the set of all turtles run the commands between the square brackets.
clear-all and crt can only be run by the observer. fd, on the other hand, can only be run by turtles. Some other commands and reporters, such as set, can be run by different agent types.
Here are some more advanced features you can take advantage of when defining your own procedures.
Your own procedures can take inputs, just like primitives do. To create a procedure that accepts inputs, include a list of input names in square brackets after the procedure name. For example:
to draw-polygon [num-sides len]
  pen-down
  repeat num-sides
    [ fd len
      rt 360 / num-sides ]
end
Elsewhere in the program, you could ask turtles to each draw an octagon with a side length equal to its who number:
ask turtles [ draw-polygon 8 who ]
Just like you can define your own commands, you can define your own reporters. You must do two special things. First, use to-report instead of to to begin your procedure. Then, in the body of the procedure, use report to report the value you want to report.
to-report absolute-value [number]
  ifelse number >= 0
    [ report number ]
    [ report (- number) ]
end
Agent variables are places to store values (such as numbers) in an agent. An agent variable can be a global variable, a turtle variable, a patch variable, or a link variable.
If a variable is a global variable, there is only one value for the variable, and every agent can access it. You can think of global variables as belonging to the observer.
Turtle, patch, and link variables are different. Each turtle has its own value for every turtle variable, and each patch has its own value for every patch variable, and the same for links.
Some variables are built into NetLogo. For example, all turtles have a color variable, and all patches have a pcolor variable. (The patch variable begins with "p" so it doesn't get confused with the turtle variable.) If you set the variable, the turtle or patch changes color. (See next section for details.)
Other built-in turtle variables including xcor, ycor, and heading. Other built-in patch variables include pxcor and pycor. (There is a complete list here.)
You can also define your own variables. You can make a global variable by adding a switch or a slider to your model, or by using the globals keyword at the beginning of your code, like this:
globals [ score ]
You can also define new turtle, patch and link variables using the turtles-own , patches-own and links-own keywords, like this:
turtles-own [energy speed]
patches-own [friction]
links-own [strength]
These variables can then be used freely in your model. Use the set command to set them. (If you don't set them, they'll start out storing a value of zero.)
Global variables can be read and set at any time by any agent. As well, a turtle can read and set patch variables of the patch it is standing on. For example, this code:
ask turtles [ set pcolor red ]
causes every turtle to make the patch it is standing on red. (Because patch variables are shared by turtles in this way, you can't have a turtle variable and a patch variable with the same name.)
In other situations where you want an agent to read a different agent's variable, you can use of. Example:
show [color] of turtle 5
;; prints current color of turtle with who number 5
You can also use of with a more complicated expression than just a variable name, for example:
show [xcor + ycor] of turtle 5
;; prints the sum of the x and y coordinates of
;; turtle with who number 5
A local variable is defined and used only in the context of a particular procedure or part of a procedure. To create a local variable, use the let command. You can use this command anywhere. If you use it at the top of a procedure, the variable will exist throughout the procedure. If you use it inside a set of square brackets, for example inside an "ask", then it will exist only inside those brackets.
to swap-colors [turtle1 turtle2]
  let temp [color] of turtle1
  ask turtle1 [ set color [color] of turtle2 ]
  ask turtle2 [ set color temp ]
end
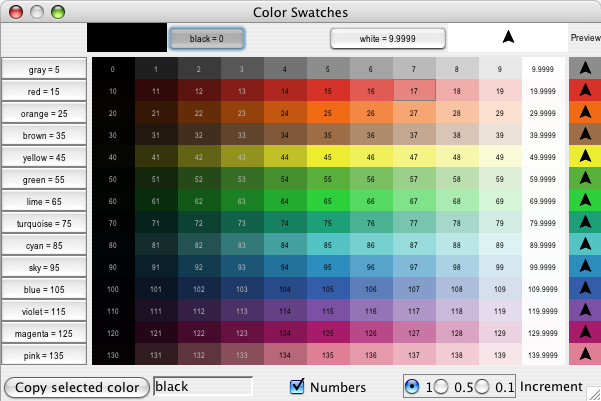
NetLogo represents colors in different ways. First, as numbers in the range 0 to 140, with the exception of 140 itself. Below is a chart showing the range of colors you can use in NetLogo.
The chart shows that:
Code Example: The color chart was made in NetLogo with the Color Chart Example model.
If you use a number outside the 0 to 140 range, NetLogo will repeatedly add or subtract 140 from the number until it is in the 0 to 140 range. For example, 25 is orange, so 165, 305, 445, and so on are orange too, and so are -115, -255, -395, etc. This calculation is done automatically whenever you set the turtle variable color or the patch variable pcolor. Should you need to perform this calculation in some other context, use the wrap-color primitive.
If you want a color that's not on the chart, more can be found between the integers. For example, 26.5 is a shade of orange halfway between 26 and 27. This doesn't mean you can make any color in NetLogo; the NetLogo color space is only a subset of all possible colors. It contains only a fixed set of discrete hues (one hue per row of the chart). Starting from one of those hues, you can either decrease its brightness (darken it) or decrease its saturation (lighten it), but you cannot decrease both brightness and saturation. Also, only the first digit after the decimal point is significant. Thus, color values are rounded down to the next 0.1, so for example, there's no visible difference between 26.5 and 26.52 or 26.58.
Color primitives
There are a few primitives that are helpful for working with colors.
We have already mentioned the wrap-color primitive.
The scale-color primitive is useful for converting numeric data into colors.
shade-of? will tell you if two colors are "shades" of the same basic hue. For example, shade-of? orange 27 is true, because 27 is a lighter shade of orange.
Code Example: Scale-color Example demonstrates the scale-color reporter.
RGB and RGBA Colors
NetLogo also represents colors as RGB (red/green/blue) lists and RGBA (red/green/blue/alpha) lists. When using RGB colors the full range of colors is available to you. RGBA colors allow all the colors that RGB allows and you can also vary the transparency of a color. RGB and RGBA lists are made up of three or four integers, respectively, between 0 and 255 if a number is outside that range 255 is repeatedly subtracted until it is in the range. You can set any color variables in NetLogo (color for turtles and links and pcolor for patches) to an RGB list and that agent will be rendered appropriately. So you can set the color of patch 0 0 to pure red using the following code:
set pcolor [255 0 0]
Turtles, links, and labels can all contain RGBA lists as their color variables, however, patches cannot have RGBA pcolors You can set the color of a turtle to be approximately half transparent pure red with the following code:
set color [255 0 0 125]
You can convert between RGB, HSB (hue/saturation/brightness), and NetLogo colors using approximate-hsb and approximate-rgb from RGB/HSB to NetLogo colors, and extract-hsb and extract-rgb in the opposite direction. You can use rgb to generate rgb lists and hsb to convert from an HSB color to RGB.
Since many colors are missing from the NetLogo color space, approximate-hsb and approximate-rgb often can't give you the exact color you ask for, but they try to come as close as possible.
You can change any turtle from it's existing NetLogo color to a half transparent version of that color using:
set color lput 125 extract-rgb color
Code Examples: HSB and RGB Example (lets you experiment with the HSB and RGB color systems), Transparency Example
Color Swatches dialog
The Color Swatches dialog helps you experiment with and choose colors. Open it by choosing Color Swatches on the Tools Menu.
When you click on a color swatch (or a color button), that color will be shown against other colors. In the bottom left, the code for the currently selected color is displayed (for example, red + 2) so you can copy and paste it into your code. On the bottom right there are three increment options, 1, 0.5, and 0.1. These numbers indicate the difference between two adjacent swatches. When the increment is 1 there are 10 different shades in each row; when the increment is 0.1 there are 100 different shades in each row. 0.5 is an intermediate setting.
NetLogo uses the ask command to give commands to turtles, patches, and links. All code to be run by turtles must be located in a turtle "context". You can establish a turtle context in any of three ways:
The same goes for patches, links, and the observer, except that you cannot ask the observer. Any code that is not inside any ask is by default observer code.
Here's an example of the use of ask in a NetLogo procedure:
to setup
  clear-all
  crt 100              ;; create 100 turtles with random headings
  ask turtles
    [ set color red    ;; turn them red
      fd 50 ]          ;; spread them around
  ask patches
    [ if pxcor > 0         ;; patches on the right side
        [ set pcolor green ] ]  ;; of the view turn green
end
The models in the Models Library are full of other examples. A good place to start looking is in the Code Examples section.
Usually, the observer uses ask to ask all turtles, all patches or all links to run commands. You can also use ask to have an individual turtle, patch or link run commands. The reporters turtle, patch, link and patch-at are useful for this technique. For example:
to setup
  clear-all
  crt 3                           ;; make 3 turtles
  ask turtle 0                    ;; tell the first one...
    [ fd 1 ]                      ;; ...to go forward
  ask turtle 1                    ;; tell the second one...
    [ set color green ]           ;; ...to become green
  ask turtle 2                    ;; tell the third one...
    [ rt 90 ]                     ;; ...to turn right
  ask patch 2 -2                  ;; ask the patch at (2,-2)
    [ set pcolor blue ]           ;; ...to become blue
  ask turtle 0                    ;; ask the first turtle
    [ ask patch-at 1 0            ;; ...to ask patch to the east
      [ set pcolor red ] ]        ;; ...to become red
  ask turtle 0                    ;; tell the first turtle...
    [ create-link-with turtle 1 ] ;; ...make a link with the second
  ask link 0 1                    ;; tell the link between turtle 0 and 1
    [ set color blue ]            ;; ...to become blue
end
Every turtle created has a who number. The first turtle created is number 0, the second turtle number 1, and so forth. The turtle primitive reporter takes a who number as an input, and reports the turtle with that who number. The patch primitive reporter takes values for pxcor and pycor and reports the patch with those coordinates. The link primitive takes two inputs, the who numbers of the two turtles it connects. And the patch-at primitive reporter takes offsets: distances, in the x and y directions, from the first agent. In the example above, the turtle with who number 0 is asked to get the patch east (and no patches north) of itself.
You can also select a subset of turtles, or a subset of patches, or a subset of links and ask them to do something. This involves a concept called "agentsets". The next section explains this concept in detail.
When you ask a set of agents to run more than one command, each agent must finish before the next agent starts. One agent runs all of the commands, then the next agent runs all of them, and so on. For example, if you write:
ask turtles
  [ fd 1
    set color red ]
first one turtle moves and turns red, then another turtle moves and turns red, and so on.
But if you write it this way:
ask turtles [ fd 1 ]
ask turtles [ set color red ]
first all of the turtles move. After they have all moved, they all turn red.
(Another form of the ask command, with a different ordering rule, is also available. See Ask-Concurrent below.)
An agentset is exactly what its name implies, a set of agents. An agentset can contain either turtles, patches or links, but not more than one type at once.
An agentset is not in any particular order. In fact, it's always in a random order. And every time you use it, the agentset is in a different random order. This helps you keep your model from treating any particular turtles, patches or links differently from any others (unless you want them to be). Since the order is random every time, no one agent always gets to go first.
You've seen the turtles primitive, which reports the agentset of all turtles, the patches primitive, which reports the agentset of all patches and the links primitive which reports the agentset of all links.
But what's powerful about the agentset concept is that you can construct agentsets that contain only some turtles, some patches or some links. For example, all the red turtles, or the patches with pxcor evenly divisible by five, or the turtles in the first quadrant that are on a green patch or the links connected to turtle 0. These agentsets can then be used by ask or by various reporters that take agentsets as inputs.
One way is to use turtles-here or turtles-at, to make an agentset containing only the turtles on my patch, or only the turtles on some other patch at some x and y offsets. There's also turtles-on so you can get the set of turtles standing on a given patch or set of patches, or the set of turtles standing on the same patch as a given turtle or set of turtles.
Here are some more examples of how to make agentsets:
;; all other turtles:
other turtles
;; all other turtles on this patch:
other turtles-here
;; all red turtles:
turtles with [color = red]
;; all red turtles on my patch
turtles-here with [color = red]
;; patches on right side of view
patches with [pxcor > 0]
;; all turtles less than 3 patches away
turtles in-radius 3
;; the four patches to the east, north, west, and south
patches at-points [[1 0] [0 1] [-1 0] [0 -1]]
;; shorthand for those four patches
neighbors4
;; turtles in the first quadrant that are on a green patch
turtles with [(xcor > 0) and (ycor > 0)
              and (pcolor = green)]
;; turtles standing on my neighboring four patches
turtles-on neighbors4
;; all the links connected to turtle 0
[my-links] of turtle 0
Note the use of other to exclude this agent. This is common.
Once you have created an agentset, here are some simple things you can do:
And here are some more complex things you can do:
ask one-of turtles [ set color green ]Or tell a randomly chosen patch to sprout a new turtle:
ask one-of patches [ sprout 1 ]
ask max-one-of turtles [sum assets] [ die ]
show mean [sum assets] of turtles
This only scratches the surface. See the Models Library for many more examples, and consult the NetLogo Dictionary for more information about all of the agentset primitives.
More examples of using agentsets are provided in the individual entries for these primitives in the NetLogo Dictionary. In developing familiarity with programming in NetLogo, it is important to begin to think of compound commands in terms of how each element passes information to the next one. Agentsets are an important part of this conceptual scheme and provide the NetLogo developer with a lot of power and flexibility, as well as being more similar to natural language.
Code Example: Ask Ordering Example
Earlier, we said that agentsets are always in random order, a different random order every time. If you need your agents to do something in a fixed order, you need to make a list of the agents instead. See the Lists section below.
NetLogo allows you to define different "breeds" of turtles and breeds of links. Once you have defined breeds, you can go on and make the different breeds behave differently. For example, you could have breeds called sheep and wolves, and have the wolves try to eat the sheep or you could have link breeds called streets and sidewalks where foot traffic is routed on sidewalks and car traffic is routed on streets.
You define turtle breeds using the breed keyword, at the top of the Procedures tab, before any procedures:
breed [wolves wolf]
breed [sheep a-sheep]
You can refer to a member of the breed using the singular form, just like the turtle reporter. When printed, members of the breed will be labeled with the singular name.
Some commands and reporters have the plural name of the breed in them, such as create-<breeds>. Others have the singular name of the breed in them, such as <breed>
The order in which breeds are declared is also the order order in which they are layered in the view. So breeds defined later will appear on top of breeds defined earlier; in this example, sheep will be drawn over wolves.
When you define a breed such as sheep, an agentset for that breed is automatically created, so that all of the agentset capabilities described above are immediately available with the sheep agentset.
The following new primitives are also automatically available once you define a breed: create-sheep, hatch-sheep, sprout-sheep, sheep-here, sheep-at, sheep-on, and is-a-sheep?.
Also, you can use sheep-own to define new turtle variables that only turtles of the given breed have. (It's allowed for more than one breed to own the same variable.)
A turtle's breed agentset is stored in the breed turtle variable. So you can test a turtle's breed, like this:
if breed = wolves [ ... ]
Note also that turtles can change breeds. A wolf doesn't have to remain a wolf its whole life. Let's change a random wolf into a sheep:
ask one-of wolves [ set breed sheep ]
The set-default-shape primitive is useful for associating certain turtle shapes with certain breeds. See the section on shapes below.
Here is a quick example of using breeds:
breed [mice mouse]
breed [frogs frog]
mice-own [cheese]
to setup
  clear-all
  create-mice 50
    [ set color white
      set cheese random 10 ]
  create-frogs 50
    [ set color green ]
end
Code Example: Breeds and Shapes Example
Link breeds are very similar to turtle breeds, however, there are a few differences.
When you declare a link breed you must declare whether it is a breed of directed or undirected links by using the directed-link-breed and undirected-link-breed keywords.
directed-link-breed [streets street]
undirected-link-breed [friendships friendship]
once you have created a breeded link you cannot create unbreeded links and vice versa. (You can, however, have directed and undirected links in the same world, just not in the same breed)
Unlike with turtle breeds the singular breed name is required for link breeds, as many of the link commands and reports use the singular name, such as <link-breed>-neighbor?.
The following primitives are also automatically available once you define a directed link breed: create-street-from create-streets-from create-street-to create-streets-to in-street-neighbor? in-street-neighbors in-street-from my-in-streets my-out-streets out-street-neighbor? out-street-neighbors out-street-to
And the following are automatically available when you define an undirected link breed: create-friendship-with create-friendships-with friendship-neighbor? friendship-neighbors friendship-with my-friendships
Multiple link breeds may declare the same -own variable, but a variable may not be shared between a turtle breed and a link breed.
Just as with turtle breeds the order in which link breeds are declared defines the order in which the links are drawn, so the friendships will always be on top of streets (if for some reason these breeds were in the same model). You can also use <link-breeds>-own to declare variables of each link breed separately.
You can change the breed of links, like turtles, however, you cannot the breed of links to be unbreeded links, to prevent having breeded and unbreeded links in the same world.
ask one-of friendships [ set breed streets ]
ask one-of friendships [ set breed links ] ;; produces a runtime error
set-default-shape may also be used with link breeds to associate it with a particular link shape.
Code Example: Link Breeds Example
Buttons in the interface tab provide an easy way to control the model. Typically a model will have at least a "setup" button, to set up the initial state of the world, and a "go" button to make the model run continuously. Some models will have additional buttons that perform other actions.
A button contains some NetLogo code. That code is run when you press the button.
A button may be either a "once button", or a "forever button". You can control this by editing the button and checking or unchecking the "Forever" checkbox. Once buttons run their code once, then stop and pop back up. Forever buttons keep running their code over and over again, until either the code hits the stop command, or you press the button again to stop it. If you stop the button, the code doesn't get interrupted. The button waits until the code has finished, then pops up.
Normally, a button is labeled with the code that it runs. For example, a button that says "go" on it usually contains the code "go", which means "run the go procedure". (Procedures are defined in the Procedures tab; see below.) But you can also edit a button and enter a "display name" for the button, which is a text that appears on the button instead of the code. You might use this feature if you think the actual code would be confusing to your users.
When you put code in a button, you must also specify which agents you want to run that code. You can choose to have the observer run the code, or all turtles, or all patches, or all links. (If you want the code to be run by only some turtles or some patches, you could make an observer button, and then have the observer use the ask command to ask only some of the turtles or patches to do something.)
When you edit a button, you have the option to assign an "action key". This makes that key on the keyboard behave just like a button press. If the button is a forever button, it will stay down until the key is pressed again (or the button is clicked). Action keys are particularly useful for games or any model where rapid triggering of buttons is needed.
Buttons take turns
More than one button can be pressed at a time. If this happens, the buttons "take turns", which means that only one button runs at a time. Each button runs its code all the way through once while the other buttons wait, then the next button gets its turn.
In the following examples, "setup" is a once button and "go" is a forever button.
Example #1: The user presses "setup", then presses "go" immediately, before the "setup" has popped back up. Result: "setup" finishes before "go" starts.
Example #2: While the "go" button is down, the user presses "setup". Result: the "go" button finishes its current iteration. Then the "setup" button runs. Then "go" starts running again.
Example #3: The user has two forever buttons down at the same time. Result: first one button runs its code all the way through, then the other runs its code all the way through, and so on, alternating.
Note that if one button gets stuck in an infinite loop, then no other buttons will run.
Turtle, patch, and link forever buttons
There is a subtle difference between putting commands in a turtle, patch or link forever button, and putting the same commands in an observer button that does ask turtles, ask patches or ask links. An "ask" doesn't complete until all of the agents have finished running all of the commands in the "ask". So the agents, as they all run the commands concurrently, can be out of sync with each other, but they all sync up again at the end of the ask. The same isn't true of turtle, patch and link forever buttons. Since ask was not used, each turtle or patch runs the given code over and over again, so they can become (and remain) out of sync with each other.
At present, this capability is very rarely used in the models in our Models Library. A model that does use the capability is the Termites model, in the Biology section of Sample Models. The "go" button is a turtle forever button, so each termite proceeds independently of every other termite, and the observer is not involved at all. This means that if, for example, you wanted to add ticks and/or a plot to the model, you would need to add a second forever button (an observer forever button), and run both forever buttons at the same time. Note also that a model like this cannot be used with BehaviorSpace.
Code Example: State Machine Example shows how Termites can be recoded in a tick-based way, without using a turtle forever button.
At present, NetLogo has no way for one forever button to start another. Buttons are only started when you press them.
In the simplest models, each variable holds only one piece of information, usually a number or a string. The list feature lets you store multiple pieces of information in a single variable by collecting those pieces of information in a list. Each value in the list can be any type of value: a number, or a string, an agent or agentset, or even another list.
Lists allow for the convenient packaging of information in NetLogo. If your agents carry out a repetitive calculation on multiple variables, it might be easier to have a list variable, instead of multiple number variables. Several primitives simplify the process of performing the same computation on each value in a list.
The NetLogo Dictionary has a section that lists all of the list-related primitives.
Constant lists
You can make a list by simply putting the values you want in the list between brackets, like this: set mylist [2 4 6 8]. Note that the individual values are separated by spaces. You can make lists that contain numbers and strings this way, as well as lists within lists, for example [[2 4] [3 5]].
The empty list is written by putting nothing between the brackets, like this: [].
Building lists on the fly
If you want to make a list in which the values are determined by reporters, as opposed to being a series of constants, use the list reporter. The list reporter accepts two other reporters, runs them, and reports the results as a list.
If I wanted a list to contain two random values, I might use the following code:
set random-list list (random 10) (random 20)
This will set random-list to a new list of two random integers each time it runs.
To make longer or shorter lists, you can use the list reporter with fewer or more than two inputs, but in order to do so, you must enclose the entire call in parentheses, e.g.:
(list random 10)
(list random 10 random 20 random 30)
For more information, see Varying number of inputs.
Some kinds of lists are most easily built using the n-values reporter, which allows you to construct a list of a specific length by repeatedly running a given reporter. You can make a list of the same value repeated, or all the numbers in a range, or a lot of random numbers, or many other possibilities. See dictionary entry for details and examples.
The of primitive lets you construct a list from an agentset. It reports a list containing each agent's value for the given reporter. (The reporter could be a simple variable name, or a more complex expression -- even a call to a procedure defined using to-report.) A common idiom is
max [...] of turtles
sum [...] of turtles
and so on.
You can combine two or more lists using the sentence reporter, which concatenates lists by combining their contents into a single, larger list. Like list, sentence normally takes two inputs, but can accept any number of inputs if the call is surrounded by parentheses.
Changing list items
Technically, lists can't be modified, but you can construct new lists based on old lists. If you want the new list to replace the old list, use set. For example:
set mylist [2 7 5 Bob [3 0 -2]]
; mylist is now [2 7 5 Bob [3 0 -2]]
set mylist replace-item 2 mylist 10
; mylist is now [2 7 10 Bob [3 0 -2]]
The replace-item reporter takes three inputs. The first input specifies which item in the list is to be changed. 0 means the first item, 1 means the second item, and so forth.
To add an item, say 42, to the end of a list, use the lput reporter. (fput adds an item to the beginning of a list.)
set mylist lput 42 mylist
; mylist is now [2 7 10 Bob [3 0 -2] 42]
But what if you changed your mind? The but-last (bl for short) reporter reports all the list items but the last.
set mylist but-last mylist
; mylist is now [2 7 10 Bob [3 0 -2]]
Suppose you want to get rid of item 0, the 2 at the beginning of the list.
set mylist but-first mylist
; mylist is now [7 10 Bob [3 0 -2]]
Suppose you wanted to change the third item that's nested inside item 3 from -2 to 9? The key is to realize that the name that can be used to call the nested list [3 0 -2] is item 3 mylist. Then the replace-item reporter can be nested to change the list-within-a-list. The parentheses are added for clarity.
set mylist (replace-item 3 mylist
                  (replace-item 2 (item 3 mylist) 9))
; mylist is now [7 10 Bob [3 0 9]]
Iterating over lists
If you want to do some operation on each item in a list in turn, the foreach command and the map reporter may be helpful.
foreach is used to run a command or commands on each item in a list. It takes an input list and a block of commands, like this:
foreach [2 4 6]
  [ crt ?
    show (word "created " ? " turtles") ]
=> created 2 turtles
=> created 4 turtles
=> created 6 turtles
In the block, the variable ? holds the current value from the input list.
Here are some more examples of foreach:
foreach [1 2 3] [ ask turtles [ fd ? ] ]
;; turtles move forward 6 patches
foreach [true false true true] [ ask turtles [ if ? [ fd 1 ] ] ]
;; turtles move forward 3 patches
map is similar to foreach, but it is a reporter. It takes an input list and another reporter. Note that unlike foreach, the reporter comes first, like this:
show map [round ?] [1.2 2.2 2.7]
;; prints [1 2 3]
map reports a list containing the results of applying the reporter to each item in the input list. Again, use ? to refer to the current item in the list.
Here is another example of map:
show map [? < 0] [1 -1 3 4 -2 -10]
;; prints [false true false false true true]
foreach and map won't necessarily be useful in every situation in which you want to operate on an entire list. In some situations, you may need to use some other technique such as a loop using repeat or while, or a recursive procedure.
The sort-by primitive uses a similar syntax to map and foreach, except that since the reporter needs to compare two objects, the two special variables ?1 and ?2 are used in place of ?.
Here is an example of sort-by:
show sort-by [?1 < ?2] [4 1 3 2]
;; prints [1 2 3 4]
Some commands and reporters involving lists and strings may take a varying number of inputs. In these cases, in order to pass them a number of inputs other than their default, the primitive and its inputs must be surrounded by parentheses. Here are some examples:
show list 1 2
=> [1 2]
show (list 1 2 3 4)
=> [1 2 3 4]
show (list)
=> []
Note that each of these special commands has a default number of inputs for which no parentheses are required. The primitives which have this capability are list, word, sentence, map, and foreach.
Lists of agents
Earlier, we said that agentsets are always in random order, a different random order every time. If you need your agents to do something in a fixed order, you need to make a list of the agents instead.
There are two primitives that help you do this, sort and sort-by.
Both sort and sort-by can take an agentset as input. The result is always a new list, containing the same agents as the agentset did, but in a particular order.
If you use sort on an agentset of turtles, the result is a list of turtles sorted in ascending order by who number.
If you use sort on an agentset of patches, the result is a list of patches sorted left-to-right, top-to-bottom.
If you use sort on an agentset of links, the result is a list of links, sorted in ascending order first by end1 then by end2 any remaining ties are resolved by breed in the order they are declared in the procedures tab.
If you need descending order instead, you can combine reverse with sort, for example reverse sort turtles.
If you want your agents to be ordered by some other criterion than the standard ones sort uses, you'll need to use sort-by instead.
Here's an example:
sort-by [[size] of ?1 < [size] of ?2] turtles
This returns a list of turtles sorted in ascending order by their turtle variable size.
Asking a list of agents
Once you have a list of agents, you might want to ask them each to do something. To do this, use the foreach and ask commands in combination, like this:
foreach sort turtles [
  ask ? [
    ...
  ]
]
This will ask each turtle in ascending order by who number. Substitute "patches" for "turtles" to ask patches in left-to-right, top-to-bottom order.
If you use foreach like this, the agents in the list run the commands inside the ask sequentially, not concurrently. Each agent finishes the commands before the next agent begins them.
Note that you can't use ask directly on a list of turtles. ask only works with agentsets and single agents.
If your model makes especially heavy use of lists, especially long lists, you may need to know the speed of the various NetLogo list operations, to help you write code that runs fast.
NetLogo lists are "singly linked" lists. This is a technical term from computer science that means that when NetLogo needs to find an item in a list, it must start at the beginning of the list and go from item to item until it finds the one it wants. For example, to find the 100th item, NetLogo must step through the previous 99 items, one at a time.
It also means that certain operations are especially efficient, namely operations at the front of the list. The first, but-first, and fput reporters are all very fast; they take the same amount of time to run, no matter how long the list is. So if you're building up a list by adding items to it one at a time, it's much faster to use fput than lput. (If that causes your list to end up backwards from how you wanted it, you can always use reverse to reverse the list once you're done building it.)
The length reporter is also fast; NetLogo always keeps track of how long every list is, so it never needs to actually measure.
Examples of reporters which are slower on longer lists include item, lput, but-last, last, and one-of.
All numbers in NetLogo are stored internally as double precision floating point numbers, as defined in the IEEE 754 standard. They are 64 bit numbers consisting of one sign bit, an 11-bit exponent, and a 52-bit mantissa. See the IEEE 754 standard for details.
An "integer" in NetLogo is simply a number that happens to have no fractional part. No distinction is made between 3 and 3.0; they are the same number. (This is the same as how most people use numbers in everyday contexts, but different from some programming languages. Some languages treat integers and floating point numbers as distinct types.)
Integers are always printed by NetLogo without the trailing ".0":
show 1.5 + 1.5
observer: 3
If a number with a fractional part is supplied in a context where an integer is expected, the fractional part is simply discarded. So for example, crt 3.5 creates three turtles; the extra 0.5 is ignored.
The range of integers is +/-9007199254740992 (2^53, about 9 quadrillion). Calculations that exceed this range will not cause runtime errors, but precision will be lost when the least significant (binary) digits are rounded off in order fit the number into 64 bits. With very large numbers, this rounding can result in imprecise answers which may be surprising:
show 2 ^ 60 + 1 = 2 ^ 60
=> true
Calculations with smaller numbers can also produce surprising results if they involve fractional quantities, since not all fractions can be precisely represented and roundoff may occur. For example:
show 1 / 6 + 1 / 6 + 1 / 6 + 1 / 6 + 1 / 6 + 1 / 6
=> 0.9999999999999999
show 1 / 9 + 1 / 9 + 1 / 9 + 1 / 9 + 1 / 9 + 1 / 9 + 1 / 9 + 1 / 9 + 1 / 9
=> 1.0000000000000002
Any operation which produces the special quantities "infinity" or "not a number" will cause a runtime error.
Scientific notation
Very large or very small floating point numbers are displayed by NetLogo using "scientific notation". Examples:
show 0.000000000001
=> 1.0E-12
show 50000000000000000000
=> 5.0E19
Numbers in scientific notation are distinguished by the presence of the letter E (for "exponent"). It means "times ten to the power of", so for example, 1.0E-12 means 1.0 times 10 to the -12 power:
show 1.0 * 10 ^ -12
=> 1.0E-12
You can also use scientific notation yourself in NetLogo code:
show 3.0E6
=> 3000000
show 8.123456789E6
=> 8123456.789
show 8.123456789E7
=> 8.123456789E7
show 3.0E16
=> 3.0E16
show 8.0E-3
=> 0.0080
show 8.0E-4
=> 8.0E-4
These examples show that numbers with fractional parts are displayed using scientific notation if the exponent is less than -3 or greater than 6. Numbers outside of NetLogo's integer range of -9007199254740992 to 9007199254740992 (+/-2^53) are also always shown in scientific notation:
show 2 ^ 60
=> 1.15292150460684698E18
When entering a number, the letter E may be either upper or lowercase. When printing a number, NetLogo always uses an uppercase E:
show 4.5e20
=> 4.5E20
Floating point accuracy
Because numbers in NetLogo are subject to the limitations of how floating point numbers are represented in binary, you may get answers that are slightly inaccurate. For example:
show 0.1 + 0.1 + 0.1
=> 0.30000000000000004
show cos 90
=> 6.123233995736766E-17
This is an inherent issue with floating point arithmetic; it occurs in all programming languages that use floating point numbers.
If you are dealing with fixed precision quantities, for example dollars and cents, a common technique is to use only integers (cents) internally, then divide by 100 to get a result in dollars for display.
If you must use floating point numbers, then in some situations you may need to replace a straightforward equality test such as if x = 1 [ ... ] with a test that tolerates slight imprecision, for example if abs (x - 1) < 0.0001 [ ... ].
Also, the precision primitive is handy for rounding off numbers for display purposes. NetLogo monitors round the numbers they display to a configurable number of decimal places, too.
The random numbers used by NetLogo are what is called "pseudo-random". (This is typical in computer programming.) That means they appear random, but are in fact generated by a deterministic process. "Deterministic" means that you get the same results every time, if you start with the same random "seed". We'll explain in a minute what we mean by "seed".
In the context of scientific modeling, pseudo-random numbers are actually desirable. That's because it's important that a scientific experiment be reproducible -- so anyone can try it themselves and get the same result that you got. Since NetLogo uses pseudo-random numbers, the "experiments" that you do with it can be reproduced by others.
Here's how it works. NetLogo's random number generator can be started with a certain seed value, which can be any integer. Once the generator has been "seeded" with the random-seed command, it always generates the same sequence of random numbers from then on. For example, if you run these commands:
random-seed 137
show random 100
show random 100
show random 100
You will always get the numbers 79, 89, and 61 in that order.
Note, however, that you're only guaranteed to get those same numbers if you're using the same version of NetLogo. Sometimes when we make a new version of NetLogo the random number generator changes. (Presently, we use a generator known as the Mersenne Twister.)
To create a number suitable for seeding the random number generator, use the new-seed reporter. new-seed creates a seed, evenly distributed over the space of possible seeds, based on the current date and time. It never reports the same seed twice in a row.
Code Example: Random Seed Example
If you don't set the random seed yourself, NetLogo sets it to a value based on the current date and time. There is no way to find out what random seed it chose, so if you want your model run to be reproducible, you must set the random seed yourself ahead of time.
The NetLogo primitives with "random" in their names (random, random-float, and so on) aren't the only ones that use pseudo-random numbers. Many other operations also make random choices. For example, agentsets are always in random order, one-of and n-of choose agents randomly, the sprout command creates turtles with random colors and headings, and the downhill reporter chooses a random patch when there's a tie. All of these random choices are governed by the random seed as well, so model runs can be reproducible.
In addition to the uniformly distributed random integers and floating point numbers generated by random and random-float, NetLogo also offers several other random distributions. See the dictionary entries for random-normal, random-poisson, random-exponential, and random-gamma.
Code run by buttons or from the command center uses the main random number generator.
Code in monitors uses an auxiliary random generator, so even if a monitor does a calculation that uses random numbers, the outcome of the model is not affected. The same is true of code in sliders.
You may want to explicitly specify that a section of code does not affect the state of the main random generator, so the outcome of the model is not affected. The with-local-randomness command is provided for this purpose. See its entry in the NetLogo Dictionary for more information.
In NetLogo, turtle shapes are vector shapes. They are built up from basic geometric shapes; squares, circles, and lines, rather than a grid of pixels. Vector shapes are fully scalable and rotatable. NetLogo caches bitmap images of vector shapes size 1, 1.5, and 2 in order to speed up execution.
A turtle's shape is stored in its shape variable and can be set using the set command.
New turtles have a shape of "default". The set-default-shape primitive is useful for changing the default turtle shape to a different shape, or having a different default turtle shape for each breed of turtle.
The shapes primitive reports a list of currently available turtle shapes in the model. This is useful if, for example, you want to assign a random shape to a turtle:
ask turtles [ set shape one-of shapes ]
Use the Turtle Shapes Editor to create your own turtle shapes, or to add shapes to your model from our shapes library, or to transfer shapes between models. For more information, see the Shapes Editor section of this manual.
The thickness of the lines used to draw the vector shapes can be
controlled by the __set-line-thickness
primitive.
Code Examples: Breeds and Shapes Example, Shape Animation Example
Link Shapes are similar to turtle shapes, only you use the Link Shape Editor to create and edit them. Link shapes consist of between 0 and 3 lines which can have different patterns and a direction indicator that is composed of the same elements as turtle shapes. Links also have a shape variable that can be set to any link shape that is in the model. By default links have the "default" shape, though you can change that using set-default-shape. The link-shapes reporter reports all the link shapes included in the current model.
The thickness of the lines in the link shape is controlled by the thickness link variable.
In many NetLogo models, time passes in discrete steps, called "ticks". NetLogo includes a built-in tick counter so you can keep track of how many ticks have passed.
The current value of the tick counter is shown above the view. (You can use the Settings button to hide the tick counter, or change the word "ticks" to something else.)
In code, to retrieve the current value of the tick counter, use the ticks reporter. The tick command advances the tick counter by 1. The clear-all command resets the tick counter to 0. If you want to reset the counter to 0 without clearing everything, use the reset-ticks command.
If your model is set to use tick-based updates, then the tick command will usually also update the view. See the next section, View Updates.
We suggest using the tick command after your agents have completed all their movements and actions, but before you plot or calculate statistics. That way, if the plotting or calculating code refers to the tick counter, it will get the new value, reflecting that the tick is now complete. Example:
to go
  ask turtles [ move ]
  ask patches [ grow ]
  tick
  do-plots
end
to do-plots
  plotxy ticks count turtles
end
By putting tick before do-plots, the plotting code gets the right value of the tick counter when it uses the ticks reporter.
In most models, the tick counter starts at 0 and goes up 1 at a time, from integer to integer. But it's also possible for the tick counter to take on in-between floating point values.
To advance the tick counter by a fractional amount, use the tick-advance command. This command takes a numeric input specifying how far to advance the tick counter.
A typical use of fractional ticks is to approximate continuous or curved motion. See, for example, the GasLab models in the Models Library (under Chemistry & Physics). These models calculate the exact time at which a future event is to occur, then advance the tick counter to exactly that time.
The "view" in NetLogo lets you see the agents in your model on your computer's screen. As your agents move and change, you see them moving and changing in the view.
Of course, you can't really see your agents directly. The view is a picture that NetLogo paints, showing you how your agents look at a particular instant. Once that instant passes and your agents move and change some more, that picture needs to be repainted to reflect the new state of the world. Repainting the picture is called "updating" the view.
When does the view get updated? This section discusses how NetLogo decides when to update the view, and how you can influence when it gets updated.
NetLogo offers two updates modes, "continuous" updates and "tick-based" updates. You can switch between NetLogo's two view update modes using a popup menu at the top of the Interface tab.
Continuous updates are the default when you start up NetLogo or start a new model. Nearly every model in our Models Library, however, uses tick-based updates.
Continuous updates are simplest, but tick-based updates give you more control over when and how often updates happen.
It's important exactly when an update happens, because when updates happen determines what you see on the screen. If an update comes at an unexpected time, you may see something unexpected -- perhaps something confusing or misleading.
It's also important how often updates happen, because updates take time. The more time NetLogo spends updating the view, the slower your model will run. With fewer updates, your model runs faster.
Continuous updates are very simple. With continuous updates, NetLogo updates the view a certain number of times per second -- by default, 50 times a second when the speed slider is in the default, middle setting.
If you move the speed slider to a slower setting, NetLogo will update more than 50 times a second, effectively slowing down the model. On a faster setting, NetLogo will update less than 50 times a second. On the fastest setting, updates will be separated by several seconds.
At extremely slow settings, NetLogo will be updating so often that you will see your agents moving (or changing color, etc.) one at a time.
If you need to temporarily shut off continuous updates, use the no-display command. The display command turns updates back on, and also forces an immediate update (unless the user is fast-forwarding the model using the speed slider).
As discussed above in the Tick Counter section, in many NetLogo models, time passes in discrete steps, called "ticks". Typically, you want the view to update once per tick, between ticks. That's the default behavior with tick-based updates.
If you want additional view updates, you can force an update using the display command. (The update may be skipped if the user is fast-forwarding the model using the speed slider.)
You don't have to use the tick counter to use tick-based updates. If the tick counter never advances, the view will update only when you use the display command.
If you move the speed slider to a faster setting, NetLogo will skip some of the updates that would ordinarily have happened. Moving the speed slider to a slower setting doesn't cause additional updates; rather, it makes NetLogo pause after each update. The slower the setting, the longer the pause.
Even under tick-based updates, the view also updates whenever a button in the interface pops up (both once and forever buttons) and when a command entered in the Command Center finishes. So it's not necessary to add the display command to once buttons that don't advance the tick counter. Many forever buttons that don't advance the tick counter do need to use the display command. An example in the Models Library is the Life model (under Computer Science -> Cellular Automata). The forever buttons that let the user draw in the view use the display command so the user can see what they are drawing, even though the tick counter is not advancing.
Advantages of tick-based updates over continuous updates include:
As mentioned above, most models in our Models Library now uses tick-based updates.
Continuous updates are useful for models in which execution is not divided into short, discrete phases. An example in the Models Library is Termites. (See also, however, the State Machine Example model, which shows how to re-code Termites using ticks.)
Even for models that would normally be set to tick-based updates, it may be useful to switch to continuous updates temporarily for debugging purposes. Seeing what's going on within a tick, instead of only seeing the end result of a tick, could help with troubleshooting. After switching to continuous updates, you may want to use the speed slider to slow the model down until you see your agents moving one at a time. Don't forget to change back to tick-based updates when you are done, as the choice of update mode is saved with the model.
NetLogo's plotting features let you create plots to help you understand what's going on in your model.
Before you can plot, you need to create one or more plots in the Interface tab. Each plot should have a unique name. You'll be using its name to refer to it in your code in the Procedures tab.
For more information on using and editing plots in the Interface tab, see the Interface Guide.
Specifying a plot
If you only have one plot in your model, then you can start plotting to it right away. But if you have more than one plot, you have to specify which one you want to plot to. To do this, use the set-current-plot command with the name of the plot enclosed in double quotes, like this:
set-current-plot "Distance vs. Time"
You must supply the name of the plot exactly as you typed it when you created the plot. Note that later if you change the name of the plot, you'll also have to update the set-current-plot calls in your model to use the new name. (Copy and paste can be helpful here.)
Specifying a pen
When you make a new plot, it just has one pen in it. If the current plot only has one plot pen, then you can start plotting to it right away.
But you can also have multiple pens in a plot. You can create additional pens by editing the plot and using the controls in the "Plot Pens" section at the bottom of the edit dialog. Each pen should have a unique name. You'll be using its name to refer to it in your code in the Procedures tab.
For a plot with multiple pens, you have to specify which pen you want to plot with. If you don't specify a pen, plotting will take place with the first pen in the plot. To plot with a different pen, use the set-current-plot-pen command with the name of the pen enclosed in double quotes, like this:
set-current-plot-pen "distance"
Plotting points
The two basic commands for actually plotting things are plot and plotxy.
With plot you need only specify the y value you want plotted. The x value will automatically be 0 for the first point you plot, 1 for the second, and so on. (That's if the plot pen's "interval" is the default value of 1; you can change the interval.)
The plot command is especially handy when you want your model to plot a new point at every time step. Example:
to setup
  ...
  plot count turtles
end

to go
  ...
  plot count turtles
end
Note that in this example we plot from both the "setup" and "go" procedures. That's because we want our plot to include the initial state of the system. We plot at the end of the "go" procedure, not the beginning, because we want the plot always to be up to date after the go button stops.
If you need to specify both the x and y values of the point you want plotted, then use plotxy instead.
Code Example: Plotting Example
Other kinds of plots
By default, NetLogo plot pens plot in line mode, so that the points you plot are connected by a line.
If you want to move the pen without plotting, you can use the plot-pen-up command. After this command is issued, the plot and plotxy commands move the pen but do not actually draw anything. Once the pen is where you want it, use plot-pen-down to put the pen back down.
If you want to plot individual points instead of lines, or you want to draw bars instead of lines or points, you need to change the plot pen's "mode". Three modes are available: line, bar, and point. Line is the default mode.
Normally, you change a pen's mode by editing the plot. This changes the pen's default mode. It's also possible to change the pen's mode temporarily using the set-plot-pen-mode command. That command takes a number as input: 0 for line, 1 for bar, 2 for point.
Histograms
A histogram is a special kind of plot that measures how frequently certain values, or values in certain ranges, occur in a collection of numbers that arise in your model.
For example, suppose the turtles in your model have an age variable. You could create a histogram of the distribution of ages among your turtles with the histogram command, like this:
histogram [age] of turtles
The numbers you want to histogram don't have to come from an agentset; they could be any list of numbers.
Note that using the histogram command doesn't automatically switch the current plot pen to bar mode. If you want bars, you have to set the plot pen to bar mode yourself. (As we said before, you can change a pen's default mode by editing the plot in the Interface tab.)
The width of the bars in a histogram is controlled by the plot pen's interval. You can set a plot pen's default interval by editing the plot in the Interface tab. You can also change the interval temporarily with the set-plot-pen-interval command or the set-histogram-num-bars. If you use the latter command, NetLogo will set the interval appropriately so as to fit the specified number of bars within the plot's current x range.
Code Example: Histogram Example
Clearing and resetting
You can clear the current plot with the clear-plot command, or clear every plot in your model with clear-all-plots. The clear-all command also clears all plots, in addition to clearing everything else in your model.
If you only want to remove only the points that the current plot pen has drawn, use plot-pen-reset.
When a whole plot is cleared, or when a pen is reset, that doesn't just remove the data that has been plotted. It also restores the plot or pen to its default settings, as they were specified in the Interface tab when the plot was created or last edited. Therefore, the effects of such commands as set-plot-x-range and set-plot-pen-color are only temporary.
Ranges and autoplotting
The default x and y ranges for a plot are fixed numbers, but they can be changed at setup time or as the model runs.
To change the ranges at any time, use set-plot-x-range and set-plot-y-range. Or, you can let the ranges grow automatically. Either way, when the plot is cleared the ranges will return to their default values.
By default, all NetLogo plots have the "autoplotting" feature enabled. This means that if the model tries to plot a point which is outside the current displayed range, the range of the plot will grow along one or both axes so that the new point is visible.
In the hope that the ranges won't have to change every time a new point is added, when the ranges grow they leave some extra room: 25% if growing horizontally, 10% if growing vertically.
If you want to turn off this feature, edit the plot and uncheck the Autoplot checkbox. At present, it is not possible to enable or disable this feature only on one axis; it always applies to both axes.
Temporary plot pens
Most plots can get along with a fixed number of pens. But some plots have more complex needs; they may need to have the number of pens vary depending on conditions. In such cases, you can make "temporary" plot pens from code and then plot with them. These pens are called "temporary" because they vanish when the plot is cleared (by the clear-plot, clear-all-plots, or clear-all commands).
To create a temporary plot pen, use the create-temporary-plot-pen command. Once the pen has been created, you can use it like any ordinary pen. By default, the new pen is down, is black in color, has an interval of 1, and plots in line mode. Commands are available to change all of these settings; see the Plotting section of the NetLogo Dictionary.
Using a Legend
You can show the legend of a plot by selecting the "Show legend" checkbox in the edit dialog. If you don't want a particular pen to show up in the legend you can uncheck the "Show in Legend" checkbox for that pen also in the edit dialog.
Conclusion
Not every aspect of NetLogo's plotting system has been explained here. See the Plotting section of the NetLogo Dictionary for information on additional commands and reporters related to plotting.
Many of the Sample Models in the Models Library illustrate various advanced plotting techniques. Also check out the following code examples:
Code Examples: Plot Axis Example, Plot Smoothing Example, Rolling Plot Example
To input a constant string in NetLogo, surround it with double quotes.
The empty string is written by putting nothing between the quotes, like this: "".
Most of the list primitives work on strings as well:
but-first "string" => "tring"
but-last "string" => "strin"
empty? "" => true
empty? "string" => false
first "string" => "s"
item 2 "string" => "r"
last "string" => "g"
length "string" => 6
member? "s" "string" => true
member? "rin" "string" => true
member? "ron" "string" => false
position "s" "string" => 0
position "rin" "string" => 2
position "ron" "string" => false
remove "r" "string" => "sting"
remove "s" "strings" => "tring"
replace-item 3 "string" "o" => "strong"
reverse "string" => "gnirts"
A few primitives are specific to strings, such as is-string?, substring, and word:
is-string? "string" => true
is-string? 37 => false
substring "string" 2 5 => "rin"
word "tur" "tle" => "turtle"
Strings can be compared using the =, !=, <, >, <=, and >= operators.
If you need to embed a special character in a string, use the following escape sequences:
This section is about output to the screen. Output to the screen can also be later saved to a file using the export-output command. If you need a more flexible method of writing data to external files, see the next section, File I/O.
The basic commands for generating output to the screen in NetLogo are print, show, type, and write. These commands send their output to the Command Center.
For full details on these four commands, see their entries in the NetLogo Dictionary. Here is how they are typically used:
A NetLogo model may optionally have an "output area" in its Interface tab, separate from the Command Center. To send output there instead of the Command Center, use the output-print, output-show, output-type, and output-write commands.
The output area can be cleared with the clear-output command and saved to a file with export-output. The contents of the output area will be saved by the export-world command. The import-world command will clear the output area and set its contents to the value in imported world file. It should be noted that large amounts of data being sent to the output area can increase the size of your exported worlds.
If you use output-print, output-show, output-type, output-write, clear-output, or export-output in a model which does not have a separate output area, then the commands apply to the output portion of the Command Center.
In NetLogo, there is a set of primitives that give you the power to interact with outside files. They all begin with the prefix file-.
There are two main modes when dealing with files: reading and writing. The difference is the direction of the flow of data. When you are reading in information from a file, data that is stored in the file flows into your model. On the other hand, writing allows data to flow out of your model and into a file.
When a NetLogo model runs as an applet within a web browser, it will only be able to read data from files which are in the same directory on the server as the model file. Applets cannot write to any files.
When working with files, always begin by using the primitive file-open. This specifies which file you will be interacting with. None of the other primitives work unless you open a file first.
The next file- primitive you use dictates which mode the file will be in until the file is closed, reading or writing. To switch modes, close and then reopen the file.
The reading primitives include file-read, file-read-line, file-read-characters, and file-at-end? Note that the file must exist already before you can open it for reading.
Code Examples: File Input Example
The primitives for writing are similar to the primitives that print things in the Command Center, except that the output gets saved to a file. They include file-print, file-show, file-type, and file-write. Note that you can never "overwrite" data. In other words, if you attempt to write to a file with existing data, all new data will be appended to the end of the file. (If you want to overwrite a file, use file-delete to delete it, then open it for writing.)
Code Examples: File Output Example
When you are finished using a file, you can use the command file-close to end your session with the file. If you wish to remove the file afterwards, use the primitive file-delete to delete it. To close multiple opened files, one needs to first select the file by using file-open before closing it.
;; Open 3 files
file-open "myfile1.txt"
file-open "myfile2.txt"
file-open "myfile3.txt"

;; Now close the 3 files
file-close
file-open "myfile2.txt"
file-close
file-open "myfile1.txt"
file-close
Or, if you know you just want to close every file, you can use file-close-all.
Two primitives worth noting are file-write and file-read . These primitives are designed to easily save and retrieve NetLogo constants such as numbers, lists, booleans, and strings. file-write will always output the variable in such a manner that file-read will be able to interpret it correctly.
file-open "myfile.txt"  ;; Opening file for writing
ask turtles
  [ file-write xcor file-write ycor ]
file-close

file-open "myfile.txt"  ;; Opening file for reading
ask turtles
  [ setxy file-read file-read ]
file-close
Code Examples: File Input Example and File Output Example
Letting the user choose
The user-directory, user-file, and user-new-file primitives are useful when you want the user to choose a file or directory for your code to operate on.
This section describes how to capture a QuickTime movie of a NetLogo model.
First, use the movie-start command to start a new movie. The filename you provide should end with .mov, the extension for QuickTime movies.
To add a frame to your movie, use either movie-grab-view or movie-grab-interface, depending on whether you want the movie to show just the current view, or the entire Interface tab. In a single movie, you must use only one movie-grab- primitive or the other; you can't mix them.
When you're done adding frames, use movie-close.
;; export a 30 frame movie of the view
setup
movie-start "out.mov"
movie-grab-view ;; show the initial state
repeat 30
[ go
  movie-grab-view ]
movie-close
By default, a movie will play back at 15 frames per second. To make a movie with a different frame rate, call movie-set-frame-rate with a different number of frames per second. You must set the frame rate after movie-start but before grabbing any frames.
To check the frame rate of your movie, or to see how many frames you've grabbed, call movie-status, which reports a string that describes the state of the current movie.
To throw away a movie and delete the movie file, call movie-cancel.
Code Example: Movie Example
Movies can only be generated from the NetLogo GUI, not when running headless, or by background runs in a parallel BehaviorSpace experiment.
NetLogo movies are exported as uncompressed QuickTime files. To play a QuickTime movie, you can use QuickTime Player, a free download from Apple.
Since the movies are not compressed, they can take up a lot of disk space. You will probably want to compress your movies with third-party software. The software may give you a choice of different kinds of compression. Some kinds of compression are lossless, while others are lossy. "Lossy" means that in order to make the files smaller, some of the detail in the movie is lost. Depending on the nature of your model, you may want to avoid using lossy compression, for example if the view contains fine pixel-level detail.
One software package that can compress QuickTime movies on both the Mac and Windows platforms is QuickTime Pro. On Macs, iMovie works as well. PNG compression is a good choice for lossless compression.
The 2D and the 3D view show the world from the perspective of the observer. By default the observer is looking down on the world from the positive z-axis at the origin. You can change the perspective of the observer by using the follow, ride and watch observer commands and follow-me, ride-me and watch-me turtle commands. When in follow or ride mode the observer moves with the subject agent around the world. The difference between follow and ride is only visible in the 3D view. In the 3D view the user can change the distance behind the agent using the mouse. When the observer is following at zero distance from the agent it is actually riding the agent. When the observer is in watch mode it tracks the movements of one turtle without moving. In both views you will see a spotlight appear on the subject and in the 3D view the observer will turn to face the subject. To determine which agent is the focus you can use the subject reporter.
Code Example: Perspective Example
The drawing is a layer where turtles can make visible marks.
In the view, the drawing appears on top of the patches but underneath the turtles. Initially, the drawing is empty and transparent.
You can see the drawing, but the turtles (and patches) can't. They can't sense the drawing or react to it. The drawing is just for people to look at.
Turtles can draw and erase lines in the drawing using the pen-down and pen-erase commands. When a turtle's pen is down (or erasing), the turtle draws (or erases) a line behind it whenever it moves. The lines are the same color as the turtle. To stop drawing (or erasing), use pen-up.
Lines drawn by turtles are normally one pixel thick. If you want a different thickness, set the pen-size turtle variable to a different number before drawing (or erasing). In new turtles, the variable is set to 1.
Lines made when a turtle moves in a way that doesn't fix a direction, such as with setxy or move-to, the shortest path line that obeys the topology will be drawn.
Here's some turtles which have made a drawing over a grid of randomly shaded patches. Notice how the turtles cover the lines and the lines cover the patch colors. The pen-size used here was 2:
![[color chart]](images/drawing.gif)
The stamp command lets a turtle leave an image of itself behind in the drawing and stamp-erase lets it remove the pixels below it in the drawing.
To erase the whole drawing, use the observer commmand clear-drawing. (You can also use clear-all, which clears everything else too.)
Importing an image
The observer command import-drawing command allows you to import an image file from disk into the drawing.
import-drawing is useful only for providing a backdrop for people to look at. If you want turtles and patches to react to the image, you should use import-pcolors or import-pcolors-rgb instead.
Comparison to other Logos
Drawing works somewhat differently in NetLogo than some other Logos.
Notable differences include:
Drawing features not supported by NetLogo:
The topology of the NetLogo world has four potential values, torus, box, vertical cylinder, or horizontal cylinder. The topology is controlled by enabling or disabling wrapping in the x or y directions. The default world is a torus, as were all NetLogo worlds before NetLogo 3.1.
A torus wraps in both directions, meaning that the top and bottom edges of the world are connected and the left and right edges are connected. So if a turtle moves beyond the right edge of the world it appears again on the left and the same for the top and bottom.
A box does not wrap in either direction. The world is bounded so turtles that try to move off the edge of the world cannot. Note that the patches around edge of the world have fewer than eight neighbors; the corners have three and the rest have five.
Horizontal and vertical cylinders wrap in one direction but not the other. A horizontal cylinder wraps vertically, so the top of the world is connected to the bottom. but the left and right edges are bounded. A vertical cylinder is the opposite; it wraps horizontally so the left and right edges are connected, but the top and bottom edges are bounded.
Code Example: Neighbors Example
Since NetLogo 3.0 there have been settings to enable wrapping visually, so if a turtle shape extends past an edge, part of the shape will appear on the other edge of the view. (Turtles themselves are points that take up no space, so they cannot be on both sides of the world at once, but in the view, they appear to take up space because they have a shape.)
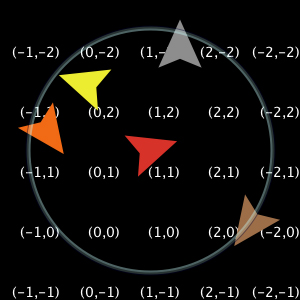
Wrapping also affects how the view looks when you are following a turtle. On a torus, wherever the turtle goes, you will always see the whole world around it:
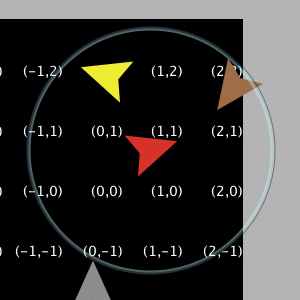
Whereas in a box or cylinder the world has edges, so the areas past those edges show up in the view as gray:
Code Example: Termites Perspective Demo (torus), Ants Perspective Demo (box)
Instead of 3.0's settings that only control the appearance of wrapping in the view, NetLogo 3.1 has settings that control whether the world actually wraps or not, that is, whether opposite edges are in fact connected. These new wrapping settings determine the world topology, that is, whether the world is a torus, box, or cylinder. This affects the behavior and not just the visual appearance of the model.
In the past, model authors were required to write extra code to simulate a box world, with the aid of special "no-wrap" primitives. No-wrap versions were provided for distance(xy), in-radius, in-cone, face(xy), and towards(xy). In 3.1 the special no-wrap versions are no longer necessary. Instead, the topology controls whether the primitives wrap or not. They always use the shortest path allowed by the topology. For example, the distance from the center of the patches in the bottom right corner (min-pxcor, min-pycor) and the upper left corner (max-pxcor, max-pycor) will be as follows for each topology given that the min and max pxcor and pycor are +/-2:
All the other primitives will act similarly to distance. If you formerly used no-wrap primitives in your model we recommend removing them and changing the topology of the world instead.
There are a number of reasons to change your model to use topologies rather than no-wrap primitives.
First, we expect if you are using no-wrap primitives, you are actually modeling a world that is not a torus. If you use a topology that matches the world you are modeling NetLogo does automatic bounds checking for you, it should make your life easier, your code simpler to understand and it adds visual cues to help the model user understand what you are modeling. Note that even with no-wrap primitives it was very difficult to model cylinders since the no-wrap primitives report the distance or heading when wrapping is not allowed in either direction.
You might have bugs in your model. If you are using a combination of no-wrap and wrap primitives, either it doesn't matter for some reason or there is a bug in your model (we found a few bugs in our models). For example, the Conductor model compared distance-no-wrap to distance to determine whether the next position is wrapped around the world, in which case the electron exits the system. This is a clever way to solve the problem, but unfortunately it is flawed. Electrons that wrap in the y direction were also exiting the system which is incorrect in this case. The only correct way to exit is to reach the cathode at the left end of the wire.
If you remove no-wrap commands the topology is no longer hard coded into the model so it's easier to test out your model on a different shape of world without a lot of extra coding (you may have to add a few extra checks to go from torus to box, this is explained more in-depth in the How to convert section.)
Note that though we've removed the no-wrap primitives from the dictionary they are still available for you to use; we did this so that old models don't have to be changed in order to run.
How to convert your model
When you first open up your model in 3.1 NetLogo will automatically change all cases of ( -screen-edge-x ) to min-pxcor and all cases of screen-edge-x to max-pxcor (and similarly for y) Though this is not directly related to the topology changes, you may also want to think about whether moving the origin off-center makes sense in your model at this time. Before NetLogo 3.1 the world had to be symmetrical around the origin, thus, the world had to have an odd width and height. This is no longer true since you may use any min and max combinations you wish, given that the point (0,0) still exists in the world. If you are logically only modeling in one or two quadrants, or if it makes your code simpler to only use positive numbers you might want to consider changing your model. If you've modeled something that requires and even grid you'll certainly want to remove the programming hacks required to make that possible in the past.
Code Examples: Lattice Gas Automaton, Binomial Rabbits, Rugby
For NetLogo 3.1 we added new primitives which are essential if you change the topology, and quite convenient even if you don't. random-pxcor, random-pycor, random-xcor, and random-ycor report random values within the range between maximum and minimum (x and y). In older versions of NetLogo we often relied on wrapping to place turtles randomly across the world by writing setxy random-float screen-size-x random-float screen-size-y. However, if wrapping is not allowed in one direction or the other this no longer works (you get a runtime error for trying to place turtles outside the world). Regardless of topology, it is simpler and more straight forward to use setxy random-xcor random-ycor instead.
To convert a model to use a topology you must first decide what settings best describe the world. If the answer is not immediately obvious to you based on the real world, (a room is a box, a wire is a cylinder) there are a few clues that will help you. If anywhere in the code you are checking the bounds of the world or if some patches are not considered neighbors of the patches on the other side of the view it is likely that you are not using a torus. If you check bounds in both the x and y directions it's a box, in the x direction only, a horizontal cylinder, the y a vertical cylinder.
If you use no-wrap primitives you are probably not modeling a torus, however, be careful with this criterion if you use a mix of no-wrap and wrap primitives. It may be that you were using a no-wrap primitive for a visual element but the rest of the NetLogo world is still a torus.
After you've determined the topology and changed it by editing the view, you may have to make a few small changes to the code. If you've decided that the world is a torus you probably don't have to make any changes at all. If your model only uses patch neighbors and diffuse you probably will not need to make many changes.
If your model has turtles that move around your next step is to determine what happens to them when they reach the edge of the world. There are a few common options: the turtle is reflected back into the world (either systematically or randomly), the turtle exits the system (dies), or the turtle is hidden. It is no longer necessary to check the bounds using turtle coordinates, instead we can just ask NetLogo if a turtle is at the edge of the world. There are a couple ways of doing this, the simplest is to use the can-move? primitive.
if not can-move? distance [ rt 180 ]
can-move? merely returns true if the position distance in front of the turtle is inside the NetLogo world, false otherwise. In this case, if the turtle is at the edge of the world it simple goes back the way it came. You can also use patch-ahead 1 != nobody in place of can-move?. If you need to do something smarter that simply turning around it may be useful to use patch-at with dx and dy.
if patch-at dx 0 = nobody [
  set heading (- heading)
]
if patch-at 0 dy = nobody [
  set heading (180 - heading)
]
This tests whether the turtle is hitting a horizontal or vertical wall and bounces off that wall.
In some models if a turtle can't move forward it simply dies (exits the system, like in Conductor or Mousetraps).
if not can-move? distance[ die ]
If you are moving turtles using setxy rather than forward you should test to make sure the patch you are about to move to exists since setxy throws a runtime error if it is given coordinates outside the world. This is a common situation when the model is simulating an infinite plane and turtles outside the view should simply be hidden.
let new-x new-value-of-xcor
let new-y new-value-of-ycor

ifelse patch-at (new-x - xcor) (new-y - ycor) = nobody
  [ hide-turtle ]
  [ setxy new-x new-y
    show-turtle ]
Several models in the Models Library use this technique, Gravitation, N-Bodies, and Electrostatics are good examples.
By using a different topology you get diffuse for free (which was fairly difficult to do in the past). Each patch diffuses and equal amount of the diffuse variable to each of its neighbors, if it has fewer than 8 neighbors (or 4 if you are using diffuse4) the remainder stays on the diffusing patch. This means that the overall sum of patch-variable across the world remains constant. If you had special code to handle diffuse then you can remove it. However, if you want the diffuse matter to still fall off the edges of the world as it would on an infinite plane you still need to clear the edges each step as in the Diffuse Off Edges Example.
A link is an agent that connects two turtles. The two turtles are called nodes. The link is always drawn as a line between the two turtles. Links do not have a location as turtles do, they are not considered to be on any patch and you cannot find the distance from a link to another point.
There are two flavors of links, undirected and directed. A directed link is out of, or from, one node and into, or to, another node. The relationship of a parent to a child could be modeled as a directed link. An undirected link appears the same to both nodes, each node has a link with another node. The relationship between spouses, or siblings, could be modeled as an undirected link.
There is a global agentset of all links, just as with turtles and patches. You can create undirected links using the create-link-with and create-links-with commands; and directed links using the create-link-to, create-links-to, create-link-from, and create-links-from commands. Once the first link has been created directed or undirected, all unbreeded links must match (links also support breeds, much like turtles, which will be discussed shortly); it's impossible to have two unbreeded links where one is directed and the other is undirected. A runtime error occurs if you try to do it. (If all unbreeded links die, then you can create links of that breed that are different in flavor from the previous links.)
In general, primitives that work with directed links have "in", "out", "to", and "from" in their names. Undirected ones either omit these or use "with".
A link's end1 and end2 variables contain the two turtles the link connects. If the link is directed, it goes from end1 to end2. If the link is undirected, end1 is always the older of the two turtles, that is, the turtle with the smaller who number.
Link breeds, like turtle breeds, allow you to define different types of links in your model. Link breeds must either be directed or undirected, unlike unbreeded links this is defined at compile time rather than run time. You declare link breeds using the keywords undirected-link-breed and directed-link-breed. Breeded links can be created using the commands create-<breed>-with and create-<breeds>-with for undirected breeds and the commands create-<breed>-to, create-<breeds>-to, create-<breed>-from, and create-<breeds>-from for directed links.
There cannot be more than one undirected link of the same breed (or two unbreeded links) between a pair of agents, nor more than one directed link of the same breed in the same direction between a pair of agents. You can have two directed links of the same breed (or two unbreeded links) between a pair if they are in opposite directions.
Layouts
As part of our network support we have also added several different primitives that will help you to visualize the networks. The simplest is layout-circle which evenly spaces the agents around the center of the world given a radius.
layout-radial is a good layout if you have something like a tree structure, though even if there are some cycles in the tree it will still work, though as there are more and more cycles it will probably not look as good. layout-radial takes a root agent to be the central node places it at (0,0) and arranges the nodes connected to it in a concentric pattern. Nodes one degree away from the root will be arranged in a circular pattern around the central node and the next level around those nodes and so on. layout-radial will attempt to account for asymmetrical graphs and give more space to branches that are wider. layout-radial also takes a breed as an input so you use one breed of links to layout the network and not another.
Given a set of anchor nodes layout-tutte places all the other nodes at the center of mass of the nodes it is linked to. The anchor set is automatically arranged in a circle layout with a user defined radius and the other nodes will converge into place (this of course means that you may have to run it several times before the layout is stable.)
layout-spring and __layout-magspring are quite similar and are useful for many kinds of networks. The drawback is that they are relatively slow since they take many iterations to converge. In both layouts the links act as springs that pull the nodes they connect toward each other and the nodes repel each other. In the magnetic spring there is also a magnetic field pulling the nodes in a compass direction you choose. The strength of all of these forces are controlled by inputs to the primitives. These inputs will always have a value between 0 and 1; keep in mind that very small changes can still affect the appearance of the network. The springs also have a length (in patch units), however, because of all the forces involved the nodes will not end up exactly that distance from each other. The magnetic spring layout also has a boolean input, bidirectional?, which indicates whether the springs should push in both directions parallel to the magnetic field; if it is true the networks will be more evenly spaced.
Code Examples:Network Example, Network Import Example, Giant Component, Small Worlds, Preferential Attachment
In previous versions of NetLogo, ask was concurrent by default. As of NetLogo 4.0, ask is serial, that is, the agents run the commands inside the ask one at a time.
The following information describes the behavior of the ask-concurrent command, which behaves the way the old ask behaved.
ask-concurrent produces simulated concurrency via a mechanism of turn-taking. The first agent takes a turn, then the second agent takes a turn, and so on until every agent in the asked agentset has had a turn. Then we go back to the first agent. This continues until all of the agents have finished running all of the commands.
An agent's "turn" ends when it performs an action that affects the state of the world, such as moving, or creating a turtle, or changing the value of a global, turtle, patch, or link variable. (Setting a local variable doesn't count.)
The forward (fd) and back (bk) commands are treated specially. When used inside ask-concurrent, these commands can take multiple turns to execute. During its turn, the turtle can only move by one step. Thus, for example, fd 20 is equivalent to repeat 20 [ fd 1 ], where the turtle's turn ends after each run of fd. If the distance specified isn't an integer, the last fraction of step takes a full turn. So for example fd 20.3 is equivalent to repeat 20 [ fd 1 ] fd 0.3.
The jump command always takes exactly one turn, regardless of distance.
To understand the difference between ask and ask-concurrent, consider the following two commands:
ask turtles [ fd 5 ]
ask-concurrent turtles [ fd 5 ]
With ask, the first turtle takes ten steps forward, then the second turtle takes ten steps forward, and so on.
With ask-concurrent, all of the turtles take one step forward. Then they all take a second step, and so on. Thus, the latter command is equivalent to:
repeat 5 [ ask turtles [ fd 1 ] ]
Code Example: Ask-Concurrent Example shows the difference between ask and ask-concurrent.
The behavior of ask-concurrent cannot always be so simply reproduced using ask, as in this example. Consider this command:
ask-concurrent turtles [ fd random 10 ]
In order to get the same behavior using ask, we would have to write:
turtles-own [steps]
ask turtles [ set steps random 10 ]
while [any? turtles with [steps > 0]] [
  ask turtles with [steps > 0] [
    fd 1
    set steps steps - 1
  ]
]
To prolong an agent's "turn", use the without-interruption command. (The command blocks inside some commands, such as create-turtles and hatch, have an implied without-interruption around them.)
Note that the behavior of ask-concurrent is completely deterministic. Given the same code and the same initial conditions, the same thing will always happen (if you are using the same version of NetLogo and begin your model run with the same random seed).
In general, we suggest you write your model so that it does not depend on the exact details of how ask-concurrent works. We make no guarantees that its semantics will remain the same in future versions of NetLogo.
Tie connects two turtles so that the movement of one turtles affects the location and heading of another. Tie is a property of links so there must be a link between two turtles to create a tie relationship.
When a link's tie-mode is set to "fixed" or "free" end1 and end2 are tied together. If the link is directed end1 is the "root agent" and end2 is the "leaf agent". That is when end1 moves (using fd, jump, setxy, etc.) end2 also moves the same distance and direction. However when end2 moves it does not affect end1.
If the link is undirected it is a reciprocal tie relationship, meaning, if either turtle moves the other turtle will also move. So depending on which turtle is moving either turtle can be considered the root or the leaf. The root turtle is always the turtle that initiates the movement.
When the root turtle turns right or left, the leaf turtle rotates around the root turtle the same amount as if a stiff were attaching the turtles. When tie-mode is set to "fixed" the heading of the leaf turtle changes by the same amount. If the tie-mode is set to "free" the heading of the leaf turtle is unchanged.
The tie-mode of a link can be set to "fixed" using the tie command and set to "none" (meaning the turtles are no longer tied) using untie to set the mode to "free" you need to: set tie-mode "free".
Code Example: Tie System Example
The __includes keyword allows you to use multiple source files in a single NetLogo model.
The keyword begins with two underscores to indicate that the feature is experimental and may change in future NetLogo releases.
When you open a model that uses the __includes keyword, or if you add it to the top of a model and hit the Check button, the includes menu will appear in the toolbar. From the includes menu you can select from the files included in this model.
When you open included files they appear in additional procedures tabs. See the Interface Guide for more details.
You can have anything in external source files (.nls) that you would normally put in the procedures tab: globals, breed, turtles-own, patches-own, breeds-own, procedure definitions, etc. Note though that these declarations all share the same namespace. That is, if you declare a global my-global in the procedures tab you cannot declare a global (or anything else) with the name my-global in any file that is included in the model. my-global will be accessible from all the included files. The same would be true if my-global were declared in one of the included files.
In the Procedures tab and elsewhere in the NetLogo user interface, program code is color-coded by the following scheme:
The remainder of this section contains technical terminology which will be unfamiliar to some readers.
The only keywords in the language are globals, breed, turtles-own, patches-own, to, to-report, and end, plus extensions and the experimental __includes keyword. (Built-in primitive names may not be shadowed or redefined, so they are effectively a kind of keyword as well.)
All primitives, global and agent variable names, and procedure names share a single global case-insensitive namespace; local names (let variables and the names of procedure inputs) may not shadow global names or each other. Identifiers may contain letters, digits, and the following ASCII characters:
.?=*!<>:#+/%$_^'&-
Non-ASCII characters are not currently allowed in identifiers. (We realize this is troublesome for international users and plan to address the issue in a future release.)
Some primitive names begin with two underscores to indicate that they are experimental and are especially likely to change or be removed in future NetLogo releases.
Identifiers beginning with a question mark are reserved.
NetLogo is lexically scoped. Local variables (including inputs to procedures) are accessible within the block of commands in which they are declared, but not accessible by procedures called by those commands.
The semicolon character introduces a comment, which lasts until the end of the line. There is no multi-line comment syntax.
A program consists of optional declarations (globals, breed, turtles-own, patches-own, <BREED>-own) in any order, followed by zero or more procedure definitions. Multiple breeds may be declared with separate breed declarations; the other declarations may appear once only.
Every procedure definition begins with to or to-report, the procedure name, and an optional bracketed list of input names. Every procedure definition ends with end. In between are zero or more commands.
Commands take zero or more inputs; the inputs are reporters, which may also take zero or more inputs. No punctuation separates or terminates commands; no punctuation separates inputs. Identifiers must be separated by whitespace or by parentheses or square brackets. (So for example, a+b is a single identifier, but a(b[c]d)e contains five identifiers.)
All commands are prefix. All user-defined reporters are prefix. Most primitive reporters are prefix, but some (arithmetic operators, boolean operators, and some agentset operators like with and in-points) are infix.
All commands and reporters, both primitive and user-defined, take a fixed number of inputs by default. (That's why the language can be parsed though there is no punctuation to separate or terminate commands and/or inputs.) Some primitives are variadic, that is, may optionally take a different number of inputs than the default; parentheses are used to indicate this, e.g. (list 1 2 3) (since the list primitive only takes two inputs by default). Parentheses are also used to override the default operator precedence, e.g. (1 + 2) * 3, as in other programming languages.
Sometimes an input to a primitive is a command block (zero or more commands inside square brackets) or a reporter block (a single reporter expression inside square brackets). User-defined procedures may not take a command or reporter block as input.
Operator precedences are as follows, high to low:
There is no agreed-upon standard definition of Logo; it is a loose family of languages. We believe that NetLogo has enough in common with other Logos to earn the Logo name. Still, NetLogo differs in some respects from most other Logos. The most important differences are as follows.
The last three differences are illustrated in the following procedure definitions:
| most Logos | NetLogo |
|---|---|
to square :x output :x * :x end |
to-report square [x] report x * x end |
Of course, the NetLogo language also contains many additional features not found in most other Logos, most importantly agents and agentsets.