Tutorial #2: Commands
NetLogo User Manual
In Tutorial #1, you had the opportunity to view some of the NetLogo
models, and you have successfully navigated your way through opening
and running models, pressing buttons, changing slider and switch
values, and gathering information from a model using plots and
monitors. In this section, the focus will start to shift from
observing models to manipulating models. You will start to see the
inner workings of the models and be able to change how they look.
Sample Model: Traffic Basic
- Go to the Models Library (File menu).
- Open up Traffic Basic, found in the "Social Science" section.
- Run the model for a couple minutes to get a feel for it.
- Consult the Information tab for any questions you may have about
this model.
In this model, you will notice one red car in a stream of blue
cars. The stream of cars are all moving in the same direction. Every
so often they "pile up" and stop moving. This is modeling how traffic
jams can form without any cause such as an accident, a broken bridge,
or an overturned truck. No "centralized cause" is needed for a
traffic jam to form.
You may alter the settings and observe a few runs to get a
full understanding of the model.
As you are using the Traffic Basic model, have
you noticed any additions you would like to make to the model?
Looking at the Traffic Basic model, you may notice the environment
is fairly simple; a black background with a white street and number of
blue cars and one red car. Changes that could be made to the model
include: changing the color and shape of the cars, adding a house or
street light, creating a stop light, or even creating another lane of
traffic. Some of these suggested changes are cosmetic and would
enhance the look of the model while the others are more behavioral.
We will be focusing more on the simpler or cosmetic changes throughout
most of this tutorial. (Tutorial #3 will
go into greater detail about behavioral changes, which require
changing the Procedures tab.)
To make these simple changes we will be using the Command
Center.
The Command Center
The Command Center is located in the Interface Tab and allows you
to enter commands or directions to the model. Commands are
instructions you can give to NetLogo's agents: turtles, patches, and
the observer. (Refer to the Interface
Guide for details explaining the different parts of the Command
Center.)
In Traffic Basic:
- Press the "setup" button.
- Locate the Command Center.
- Click the mouse in the white box at the bottom of the Command Center.
- Type the text shown here:
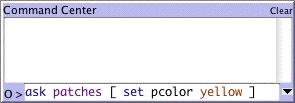
What happened to the Graphics Window?
You may have noticed the background of the Graphics Window
has turned all yellow and the street has disappeared.
Why didn't the cars turn yellow too?
Looking back at the command that was written, we asked only the
patches to change their color. In this model, the cars are
represented by a different kind of agent, called "turtles".
Therefore, the cars did not received these instructions and thus did
not change.
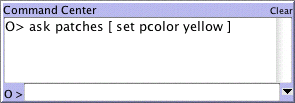
What happened in the Command Center?
You may have noticed that the command you just typed is now
displayed in the white box in the middle of the Command Center as
shown below:
- Type in the white box at the bottom of the Command Center the text shown below:
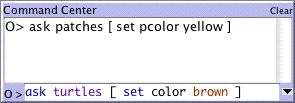
Was the result what you expected?
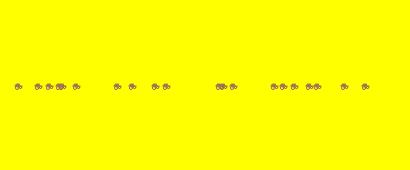
Your Graphics Window should have a yellow background with a
line of brown cars in the middle of the window:
The NetLogo world is a two dimensional world that is made up of
turtles, patches and an observer. The patches create the ground in
which the turtles can move around on and the observer is a being that
oversee everything that is going on in the world. (For a detailed
description and specifics about this world, refer to the NetLogo Programming Guide.)
In the Command Center, we have the ability to give the observer a
command, the turtles a command, or the patches a command. We choose
between these options by
using the popup menu located in the bottom left corner of the Command
Center. You can also use the tab key on your keyboard to cycle
through the different options.
- In the Command Center, click on the "O>" in the bottom left corner:

- Choose "Turtles" from the popup menu.
- Type set color pink and press return.
- Press the tab key until you see "P>" in the bottom left corner.
- Type set pcolor white and press return.
What does the Graphics Window look like now?
Do you notice any differences between these two
commands and the observer commands from earlier?
The observer oversees the world and therefore can give a command to
the patches or turtles using ask. Like in the first example
(O>ask patches [set pcolor yellow]),
the observer has to ask the patches to set their pcolor to yellow. But
when a command is directly given to a group of agents like in the
second example (P>set pcolor white), you only have to give the command itself.
What happened?
Why did the Graphic Window revert back to the old version, with the
black background and white road? Upon pressing the
"setup" button, the model will reconfigure itself back to the settings
outlined in the Procedures tab. The Command Center is not often
used to permanently change the model. It is most often used as a tool
to customize current models and allows for you to manipulate the
NetLogo world to further answer those "What if" questions that pop up
as you are investigating the models. (The Procedures tab is explained in the
next tutorial, and in the Programming
Guide.)
Now that we have familiarized ourselves with the Command Center,
let's look at some more details about how colors work in NetLogo.
Working With Colors
You may have noticed in the previous section that we used two
different words for changing color: color and
pcolor.
What is the difference between color and pcolor?
- Choose "Turtles" from the popup menu in the Command Center
(or use the tab key).
- Type set color blue and press return.
What happened to the cars?
Think about what you did to make the cars turn blue, and try to
make the patches turn red.
If you try to ask the patches to set color red, an error message
occurs:
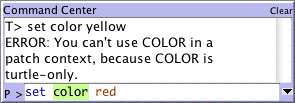
- Type set pcolor red instead and press return.
We call color and pcolor "variables". Some commands
and variables are specific to turtles and some are specific to
patches. For example, the color variable is a turtle
variable, while the pcolor variable is a patch variable.
Go ahead and practice altering the colors of the turtles and
patches using the set command and these two variables.
To be able to make more changes to the colors of turtles and patches, or
shall we say cars and backgrounds, we need to gain a little insight into how
NetLogo deals with colors.
In NetLogo, all colors have a numeric value. In all of the
exercises we have been using the name of the color. This is because
NetLogo recognizes 16 different color names. This does not mean that
NetLogo only recognizes 16 colors. There are many shades in between
these colors that can be used too. Here's a chart that shows the
whole NetLogo color space:
![[color chart]](images/colors.jpg)
To get a color that doesn't have its own name, you just refer to it
by a number instead, or by adding or subtracting a number from a name.
For example, when you type set color red, this does the same
thing as if you had typed set color 15. And you can get a
lighter or darker version of the same color by using a number that is
a little larger or a little smaller, as follows.
- Choose "Patches" from the popup menu in the Command Center
(or use the tab key).
- Type set pcolor red - 2 (The spacing around the "-" is important.)
By subtracting from red, you make it darker.
By adding to red, you make it lighter.
You can use this technique on any of the colors listed in the
chart.
Agent Monitors and Agent Commanders
In the previous activity, we used the set command to change the
colors of all the cars. But if you recall, the original model
contained one red car amongst a group of blue cars. Let's look at how
to change only one car's color.
- Press "setup" to get the red car to reappear.
- If you are on a Macintosh, hold down the Control key and
click on the red car. On other operating systems, click
on the red car with the right mouse button.
- From the popup menu that appears, choose "inspect turtle 0"
A turtle monitor for that car will appear:
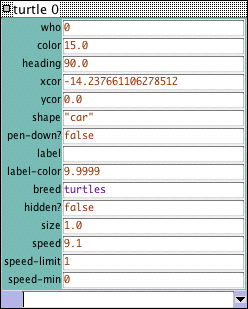
Taking a closer look at this turtle monitor, we can see all of the
variables that belong to the red car. A variable is a place that holds
a value that can be changed. Remember when it was mentioned that all
colors are represented in the computer as numbers? The same is true
for the agents. For example, turtles have an ID number we call their
"who" number.
Let's take a closer look at the turtle monitor:
What is this turtle's who number?
What color is this turtle?
What shape is this turtle?
This turtle monitor is showing a turtle who that has a who number
of 0, a color of 15 (red -- see above chart), and the shape of a car.
There are two other ways to open a turtle monitor besides
right-clicking (or control-clicking, depending on your operating
system). One way is to choose "Turtle Monitor" from the Tools
menu, then type the who number of the turtle you want to inspect
into the "who" field and press return. The other way is to type
inspect turtle 0 (or other who number) into the Command
Center.
You close a turtle monitor by clicking the close box
in the upper left hand corner (Macintosh) or upper right hand
corner (other operating systems).
Now that we know more about Agent Monitors, we have three ways to
change an individual turtle's color.
One way is to use the box called an Agent Commander found at the
bottom of an Agent Monitor. You type commands here, just like in the
Command Center, but the commands you type here are only done by this
particular turtle.
- In the Agent Commander of the Turtle Monitor for turtle 0, type
set color pink.
What happens in the Graphics Window?
Did anything change in the Turtle Monitor?
A second way to change one turtle's color is to go directly to the
color variable in the Turtle Monitor and change the value.
- Select the text to the right of "color" in the Turtle Monitor.
- Type in a new color such as green + 2.
What happened?
The third way to change an individual turtle's or patch's color is
to use the observer. Since, the observer oversees the NetLogo world,
it can give commands that affect individual turtles,
as well as groups of turtles.
- In the Command Center, select "Observer" from the popup menu
(or use the tab key).
- Type ask turtle 0 [set color blue] and press return.
What happens?
Just as there are Turtle Monitors, there are also Patch
Monitors. Patch monitors work very similarly to Turtle Monitors.
Can you make a patch monitor and use it to
change the color of a single patch?
If you try to have the observer ask patch 0 [set pcolor blue], you'll
get an error message:

To ask an individual turtle to do something, we use its who number.
But patches don't have who numbers, therefore we need to refer to
them some other way.
Remember, patches are arranged on a coordinate system. Two numbers
are needed to plot a point on a graph: an x-axis value and a y-axis
value. Patch locations are designated in the same way as plotting a
point.
- Open a patch monitor for any patch.
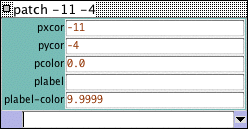
The monitor shows that for the patch in the picture, its
pxcor variable is -11 and its pycor variable is -4.
If we go back to the analogy of the coordinate plane and wanted to
plot this point, the point would be found in the lower left quadrant
of the coordinate plane where x=-11 and y=-4.
To tell this particular patch to change color, use its
coordinates.
- Type ask patch -11 -4 [set pcolor blue] and press return.
What are the two words in this command that "tip
you off" that we are addressing a patch?
What's Next?
At this point, you may want to take some time to try out the
techniques you've learned on some of the other models in the Models
Library.
In Tutorial #3: Procedures you can
learn how to alter and extend existing models and build your own
models.