- Open the Models Library from the File menu.
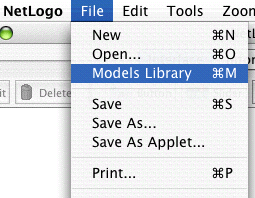
- Choose "Wolf Sheep Predation" from the Biology section and press "Open".
If you read the Sample Model: Party section, you got a brief introduction to what it's like to interact with a NetLogo model. This section will go into more depth about the features that are available while you're exploring the models in the Models Library.
Throughout all of the tutorials, we'll be asking you to make predictions about what the effects of making changes to the models will be. Keep in mind that the effects are often surprising. We think these surprises are exciting and provide excellent opportunities for learning.
Some people have found it helpful to print out the tutorials in order to work through them. When the tutorials are printed out, there's more room on your computer screen for the NetLogo model you're looking at.
- Open the Models Library from the File menu.
- Choose "Wolf Sheep Predation" from the Biology section and press "Open".
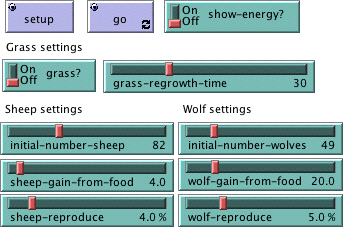
The Interface tab will fill up with lots of buttons, switches, sliders and monitors. These interface elements allow you to interact with the model. Buttons are blue; they set up, start, and stop the model. Sliders and switches are green; they alter model settings. Monitors and plots are beige; they display data.
If you'd like to make the window larger so that everything is easier to see, you can use the zoom menu at the top of the window.
When you first open the model, you will notice that the Graphics Window is empty (all black). To begin the model, you will first need to set it up.
- Press the "setup" button.
What do you see appear in the Graphics Window?
- Wait until the "setup" button pops back up (in other words, turns blue again).
- Press the "go" button to start the simulation.
As the model is running, what is happening to the wolf and sheep populations?
- Press the "go" button to stop the model.
When a button is pressed, the model responds with an action. A button can be a "once" button, or a "forever" button. You can tell the difference between these two types of buttons by a symbol on the face of the button. Forever buttons have two arrows in the bottom right corners, like this:

Once buttons don't have the arrows, like this:

Once buttons do one action and then stop. When the action is finished, the button pops back up. (Note: If you do not wait for the button to pop back up before pressing any other buttons, the model might get confused, and you may get an error message.)
Forever buttons do an action over and over again. When you want the action to stop, press the button again. It will finish the current action, then pop back up.
Most models, including Wolf Sheep Predation, have a once button called "setup" and a forever button called "go". Many models also have a once button called "go once" or "step once" which is like "go" except that it advances the model by one time step instead of over and over. Using a once button like this lets you watch the progress of the model more closely.
Stopping a forever button is the normal way to stop a model. It's safe to pause a model by stopping a forever button, then make it go on by pressing the button again. You can also stop a model with the "Halt" item on the Tools menu, but you should only do this if the model is stuck for some reason. Using "Halt" may interrupt the model in the middle of an action, and as the result the model could get confused.
- If you like, experiment with the "setup" and "go" buttons in the Wolf Sheep Predation model.
Do you ever get different results if you run the model several times with the same settings?
The settings within a model give you an opportunity to work out different scenarios or hypotheses. Altering the settings and then running the model to see how it reacts to those changes can give you a deeper understanding of the phenomena being modeled. Switches and sliders give you access to a model's settings.
Here are the switches and sliders in Wolf Sheep Predation:
Let's experiment with their effect on the behavior of the model.
- Open Wolf Sheep Predation if it's not open already.
- Press "setup" and "go" and let the model run for about a 100 time-ticks. (Note: there is a readout of the number of ticks right above the plot.)
- Stop the model by pressing the "go" button.
What happened to the sheep over time?
Let's take a look and see what would happen to the sheep if we change one of the settings.
- Turn the "grass?" switch on.
- Press "setup" and "go" and let the model run for a similar amount of time as before.
What did this switch do to the model? Was the outcome the same as your previous run?
Just like buttons, switches have information attached to them. Their information is set up in an on/off format. Switches turn on/off a separate set of directions. These directions are usually not necessary for the model to run, but might add another dimension to the model. Turning the "grass?" switch on affected the outcome of the model. Prior to this run, the growth of the grass stayed constant. This is not a realistic look at the predator-prey relationship; so by setting and turning on a grass growth rate, we were able to model all three factors: sheep, wolf and grass populations.
Another type of setting is called a slider.
Sliders are a different type of setting then a switch. A switch has two values: on or off. A slider has a range of numeric values that can be adjusted. For example, the "initial-number-sheep" slider has a minimum value of 0 and a maximum value of 250. The model could run with 0 sheep or it could run with 250 sheep, or anywhere in between. Try this out and see what happens. As you move the marker from the minimum to the maximum value, the number on the right side of the slider changes; this is the number the slider is currently set to.
Let's investigate Wolf Sheep Predation's sliders.
- Read the contents of the Information tab, located above the toolbar, to learn what each of this models' sliders represents.
The Information tab is extremely helpful for gaining insight into the model. Within this tab you will find an explanation of the model, suggestions on things to try, and other information. You may want to read the Information tab before running a model, or you might want to just start experimenting, then look at the Information tab later.
What would happen to the sheep population if there was more initial sheep and less initial wolves at the beginning of the simulation?
- Turn the "grass?" switch off.
- Set the "initial-number-sheep" slider to 100.
- Set the "initial-number-wolves" slider to 20.
- Press "setup" and then "go".
- Let the model run for about 100 time-ticks.
Try running the model several times with these settings.
What happened to the sheep population?
Did this outcome surprise you? What other sliders or switches can be adjusted to help out the sheep population?
- Set "initial-number-sheep" to 80 and "initial-number-wolves" to 50. (This is close to how they were when you first opened the model.)
- Set "sheep-reproduce" to 10.0%.
- Press "setup" and then "go".
- Let the model run for about 100 time ticks.
What happened to the wolves in this run?
When you open a model, all the sliders and switches are on a default setting. If you open a new model or exit the program, your changed settings will not be saved, unless you choose to save them.
(Note: in addition to sliders and switches, some models have a third kind of setting, called a choice. The Wolf Sheep Predation doesn't have any of these, though.)
A purpose to modeling is to gather data on a subject or topic that would be very difficult to do in a laboratory situation. NetLogo has two main ways of displaying data to the user: plots and monitors.
The plot in Wolf Sheep Predation contains three lines: sheep, wolves, and grass / 4. (The grass count is divided by four so it doesn't make the graph too tall.) The lines show what's happening in the model over time. To see which line is which, click on "Pens" in the upper right corner of the plot window to open the plot pens legend. A key appears that indicates what each line is plotting. In this case, it's the population counts.
When a plot gets close to becoming filled up, the horizontal axis increases in size and all of the data from before gets squeezed into a smaller space. In this way, more room is made for the plot to grow.
If you want to save the data from a plot to view or analyze it in another program, you can use the "Export Plot" item on the File menu. It saves this information to your computer in a format that can by read back by spreadsheet and database programs such as Excel. You can also export a plot by control-clicking (Mac) or right-clicking (Windows) it and choosing "Export..." from the popup menu.
Monitors are another method of displaying information in a model. Here are the monitors in Wolf Sheep Predation:

The monitor labeled "time-ticks" tells us how much time has passed in the model. The other monitors show us the population of sheep and wolves, and the amount of grass. (Remember, the amount of grass is divided by four to keep the graph from getting too tall.)
The numbers displayed in the monitors update continuously as the model runs, whereas the plots show you data from the whole course of the model run.
Note that NetLogo has also another kind of monitor, called "agent monitors". These will be introduced in Tutorial #2.
If you look at the graphics window, you'll see a strip of controls along the top edge. The control strip lets you control various aspects of the graphics window.
Let's experiment with the effect of these controls.
- Press "setup" and then "go" to start the model running.
- As the model runs, move the slider in the control strip back and forth.
What happens?
This slider is helpful if a model is running too fast for you to see what's going on in detail.
- Move the speed slider all the way to the right again.
- Now try pressing and unpressing the red arrowhead in the control strip.
- Also try pressing and unpressing the on/off switch in the control strip.
What happens?
The shapes button and the display button are useful if you're impatient and want a model to run faster. When shapes are turned off, turtles are drawn as solid squares; it takes less work for NetLogo to draw squares than special shapes, so the model runs faster.
The display button "freezes" the display. The model continues to run in the background, and plots and monitors still update; but if you want to see what's happening in the graphics window, you need to unfreeze the display by turning the switch back on. Most models run much faster when the display is frozen.
The size of the Graphics Window is determined by three separate settings: Screen Edge X, Screen Edge Y, and Patch Size. Let's take a look at what happens when we change the size of the Graphics Window in the "Wolf Sheep Predation" model.
- Experiment with the three sets of black arrows on the left of the control strip.
What happens the first time you press one of them?
What happens after that? Try all three sets of arrows.
The arrows give you a convenient way of changing the number of patches in the world. NetLogo can't change the number of patches without starting the model over from the beginning, so that's why it warns you the first time you press an arrow.
There are more graphics window settings than there's room for in the control strip. The "More..." button lets you get to the rest of the settings.
- Press the "More..." button in the control strip.
A dialog box will open containing all the settings for the Graphics Window:
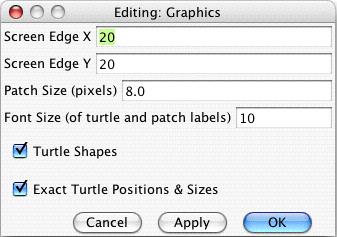
What are the current settings for Screen Edge X, Screen Edge Y, and Patch Size?
- Press "cancel" to make this window go away without changing the settings.
- Place your mouse pointer next to, but still outside of, the Graphics Window.
You will notice that the pointer turns into a crosshair.
- Hold down the mouse button and drag the crosshair over the Graphics Window.
The Graphics Window is now selected, which you know because it is now surrounded by a gray border.
- Drag one of the square black "handles". The handles are found on the edges and at the corners of the Graphics Window.
- Unselect the graphics window by clicking anywhere in the white background of the Interface tab.
- Press the "More..." button again and look at the settings.
What numbers changed?
What numbers didn't change?
The NetLogo world is a two dimensional grid of "patches". Patches are the individual squares in the grid.
In Wolf Sheep Predation, when the "grass?" switch is on the individual patches are easily seen, because some of them are green, while others are brown.
Think of the patches as being like square tiles in a room with a tile floor. Exactly in the middle of the room is a tile labeled (0,0); meaning that if the room was divided in half one way and then the other way, these two dividing lines would intersect on this tile. We now have a coordinate system that will help us locate objects within the room:
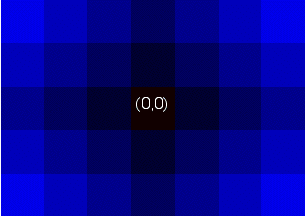
How many tiles away is the (0,0) tile from the right side of the room?
How many tiles away is the (0,0) tile from the left side of the room?
In NetLogo, the distance the middle tile is from the right or left edge of the room this is called Screen Edge X. And the distance the middle tile is from the top and bottom edges is called Screen Edge Y:
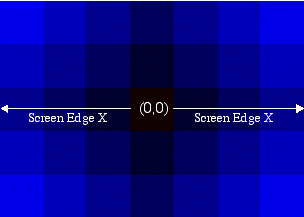
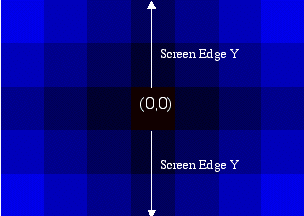
In these diagrams, Screen Edge X is 3 and Screen Edge Y is 2.
When you change the patch size, the number of patches (tiles) doesn't change, the patches only get larger or smaller on the screen.
Let's look at the effect of changing Screen Edge X and Screen Edge Y.
- Using the Edit dialog that is still open, change Screen Edge X to 30 and Screen Edge Y value to 10.
What happened to the shape of the Graphics Window?
- Press the "setup" button.
Now you can see the new patches you have created.
- Edit the Graphics Window again.
- Change the patch size to 20 and press "OK".
What happened to the size of the Graphics Window? Did its shape change?
Editing the Graphics window also lets you change three other settings: the font size of labels, whether the Graphics Window uses shapes, and whether turtles are drawn in their exact positions or whether they "snap" to fixed grid positions. Feel free to experiment with these settings as well.
Once you are done exploring the Wolf Sheep Predation model, you may want to take some time just to explore some of the other models available in the Models Library.
The library contains five sections: Sample Models, Curricular Models, Code Examples, HubNet Calculator Activities, HubNet Computer Activities.
The Sample Models section is organized by subject area and currently contains more than 140 models. We are continuously working on adding new models to it, so come visit this section at a later date to view the new additions to the library.
Some of the folders in Sample Models have folders inside them labeled "(unverified)". These models are complete and functional, but are still in the process of being reviewed for content, accuracy, and quality of code.
These are models designed to be used in schools in the context of curricula developed by the CCL at Northwestern University. Some of these are models are also listed under Sample Models; others are unique to this section. See the info tabs of the models for more information on the curricula they go with.
These are simple demonstrations of particular features of NetLogo. They'll be useful to you later when you're extending existing models or building new ones. For example, if you wanted to put a histogram within your model, you'd look at "Histogram Example" to find out how.
This section contains participatory simulations for use in the classroom. For more information about HubNet, see the HubNet Guide.
If you want to learn how to explore models at a deeper level, Tutorial #2: Commands will introduce you to the NetLogo modeling language.
In Tutorial #3: Procedures you can learn how to alter and extend existing models and build your own models.